
Venturz Website Builder makes it easy to create and manage pages for your startup or business. You can build pages from scratch, use ready-made templates, or generate content with the help of AI—all without needing to write code.
You can build your entire site on Venturz using the default URL (e.g. yourstartup.venturz.site). Take your time designing everything—pages, products, content—until you're ready. Once it’s all set, you can connect your custom domain with just a few clicks.
Below are the steps to help you get started:
Overview of Our Website Builder
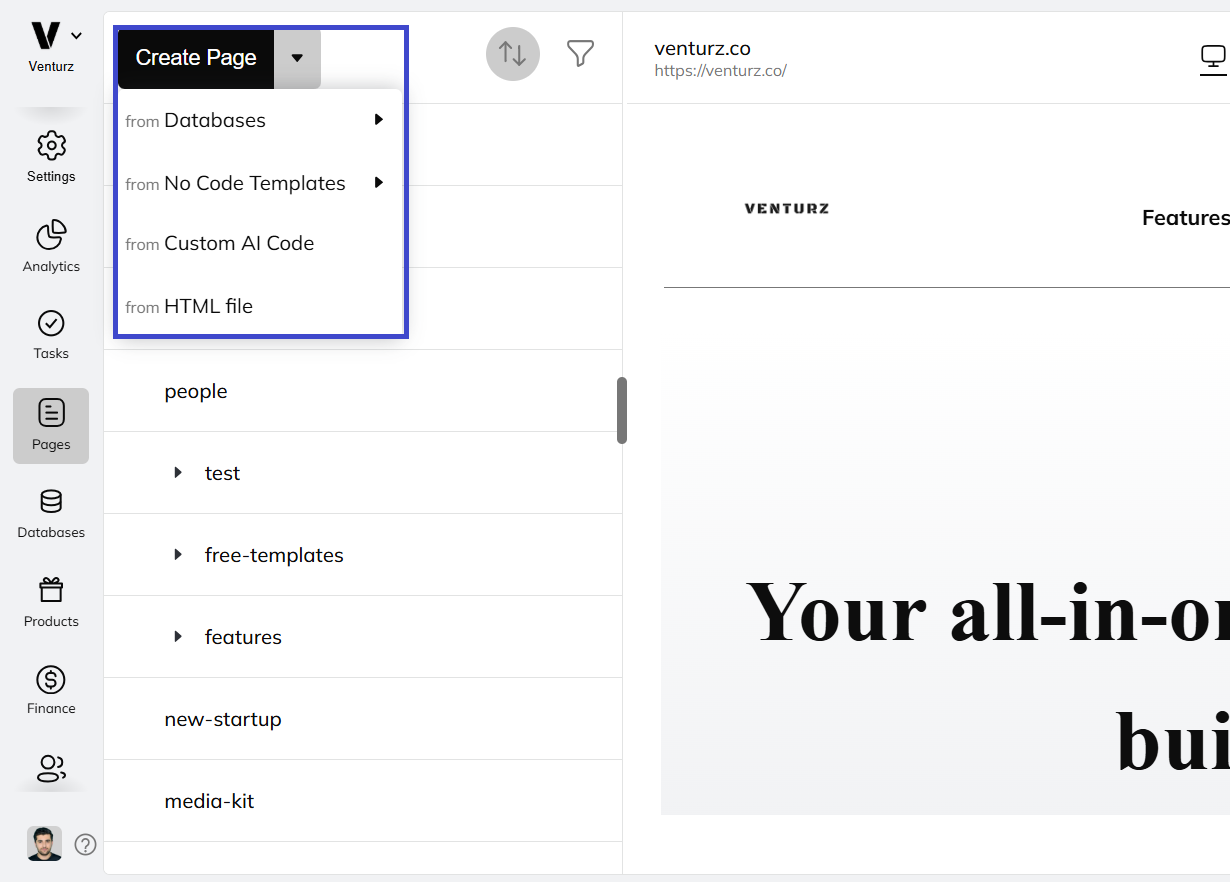
To create a new page:
Go to the Pages section in your dashboard. At the top, click the Create Page button.
You’ll see options to:
- From Databases
- From No Code Templates
- From Custom AI Code
- From HTML File
If you want to build a page from scratch, just click Create Page.
Then:
- Choose the Page Path—this means the URL path of the page. Example: /about, /pricing, or /blog/post-name
- Decide if it’s a main page or a subpage under another section.
- Click Create to start editing your new page.

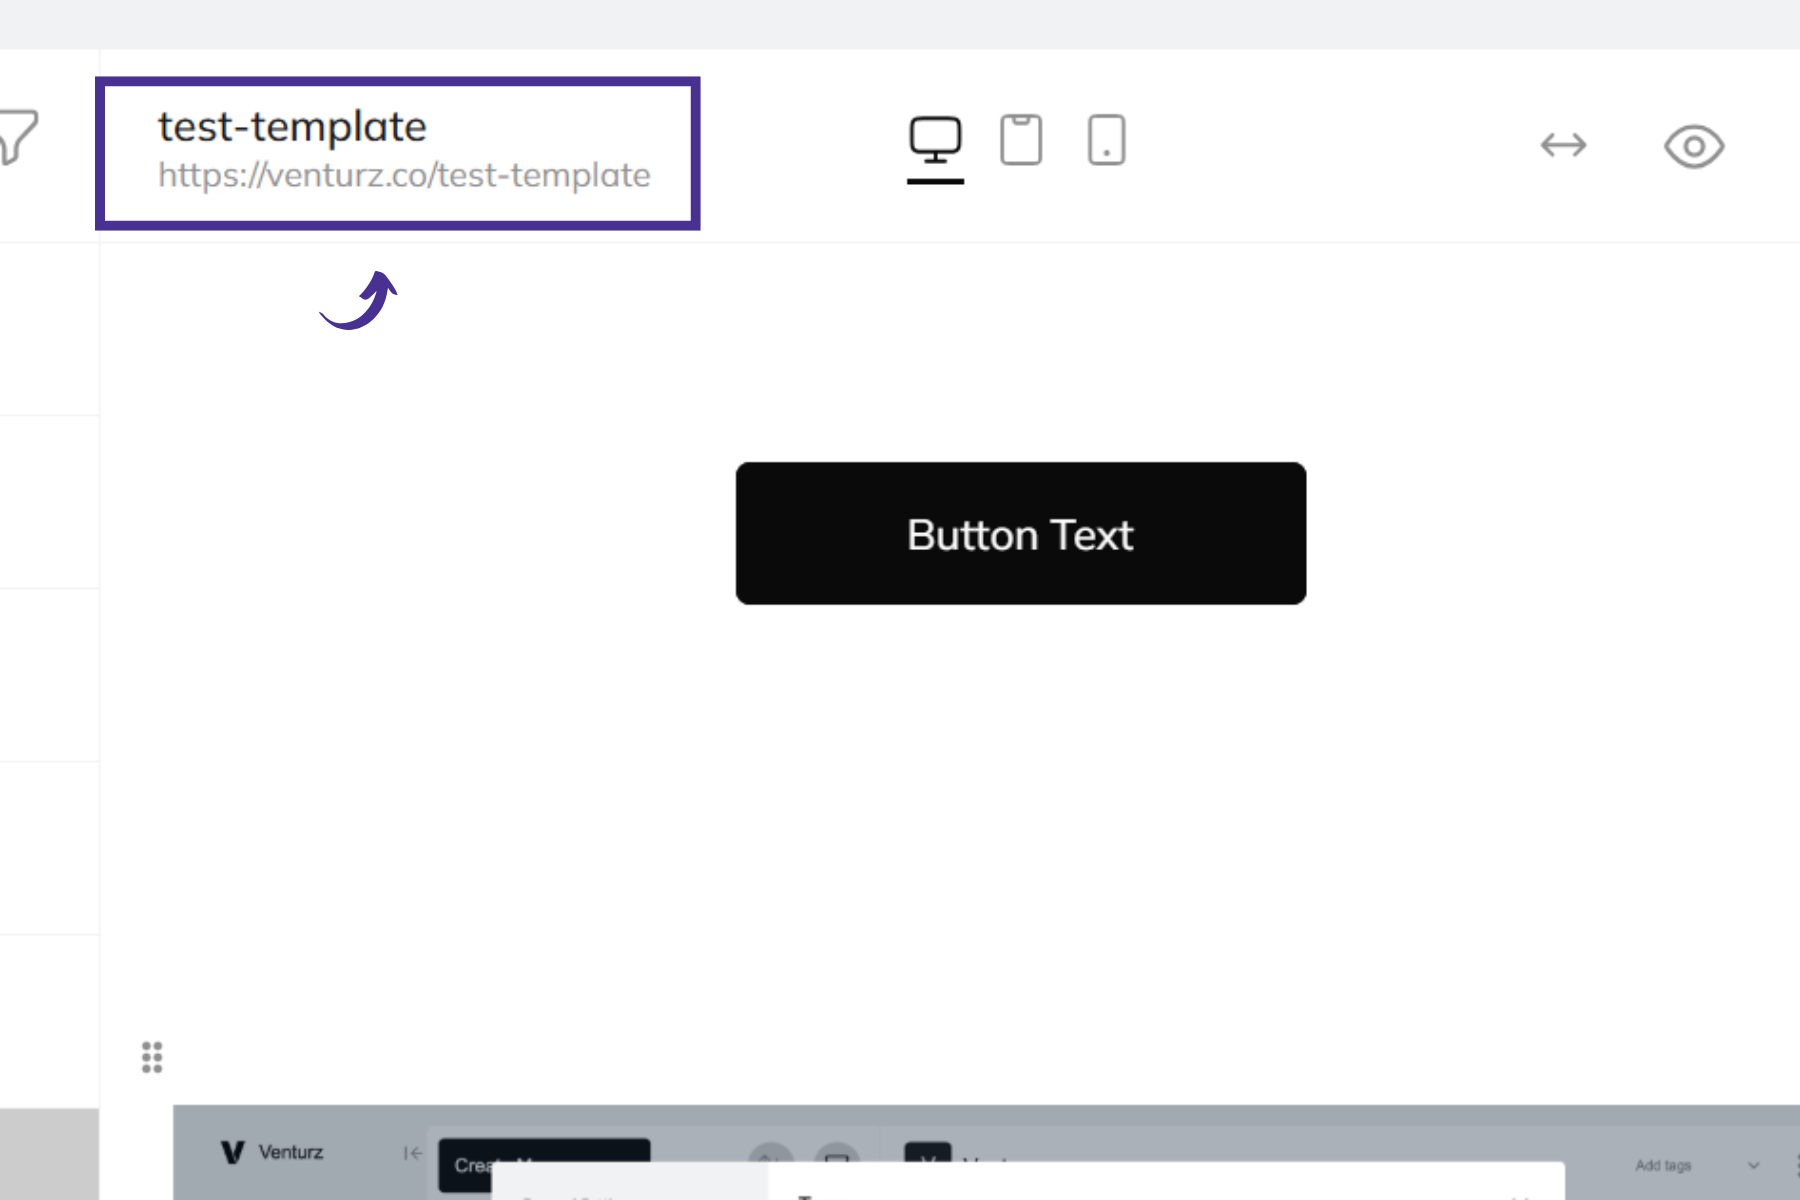
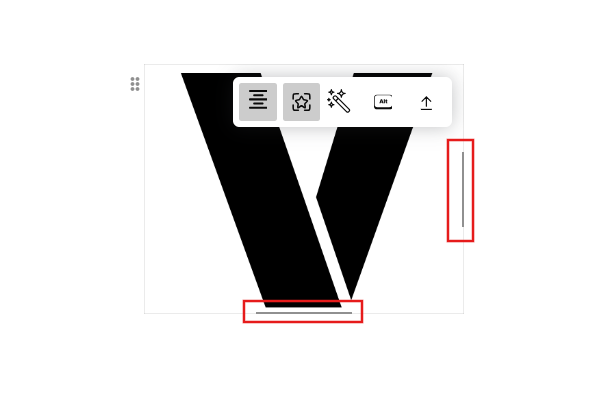
Once your page is created, the editor will open. Click the arrow icon in the corner to expand the editor to full screen.
To get a full view of your page, simply click on these handles. This will collapse the side panels and give you a wider, distraction-free editing area. You can click the handles again anytime to bring the panels back.
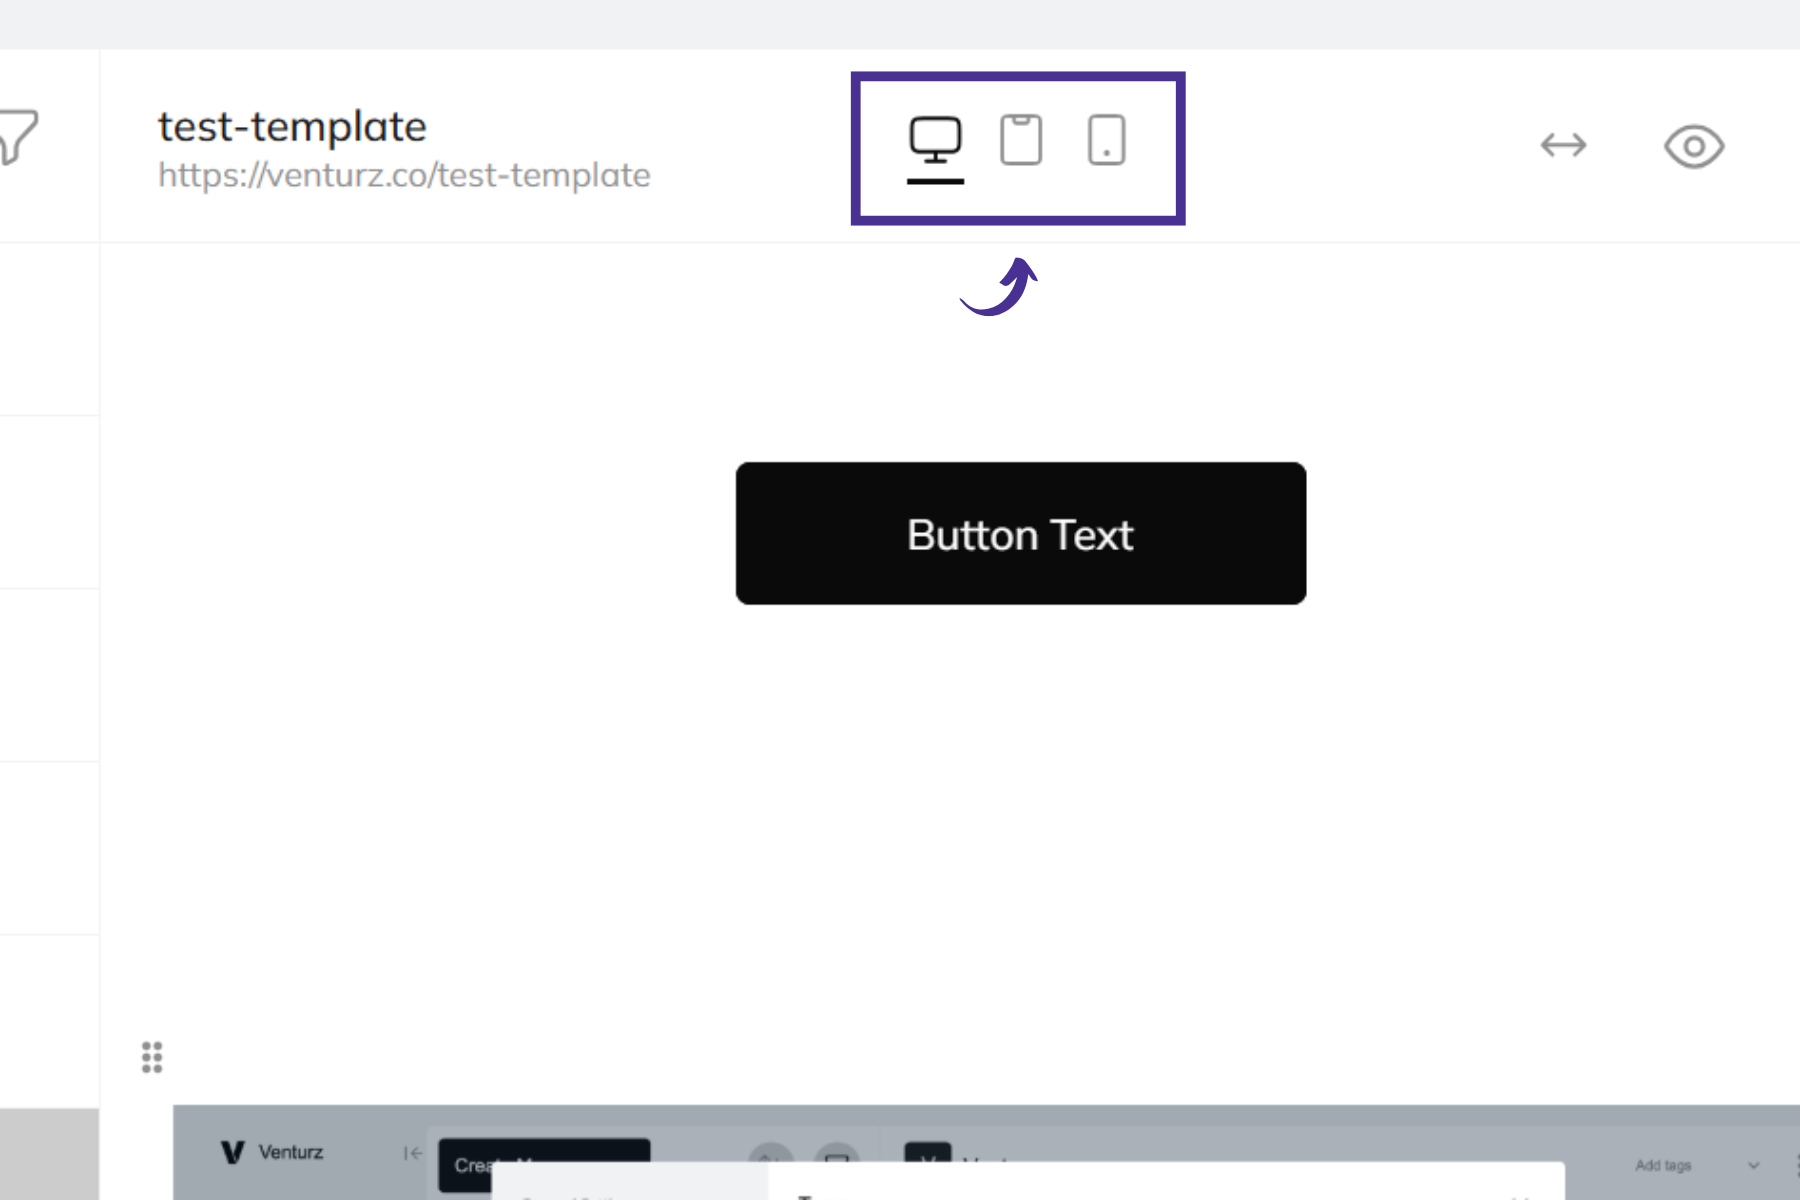
You can switch between desktop, tablet, and mobile views by clicking the icons located in the middle of the top bar.
Clicking this link will open the live version of your published page in a new tab—just like any visitor would see it.
You can change the visibility of a page and set it to public, private, logged-in users, or selected users. This is useful if you're setting up a gated page for your users/customers or controlling whether it's indexed by search engines.


You can now begin adding content to your page.
- Simply start typing, or
- Use the “/” (slash) command to insert content blocks.
Here are the available content blocks you can add:
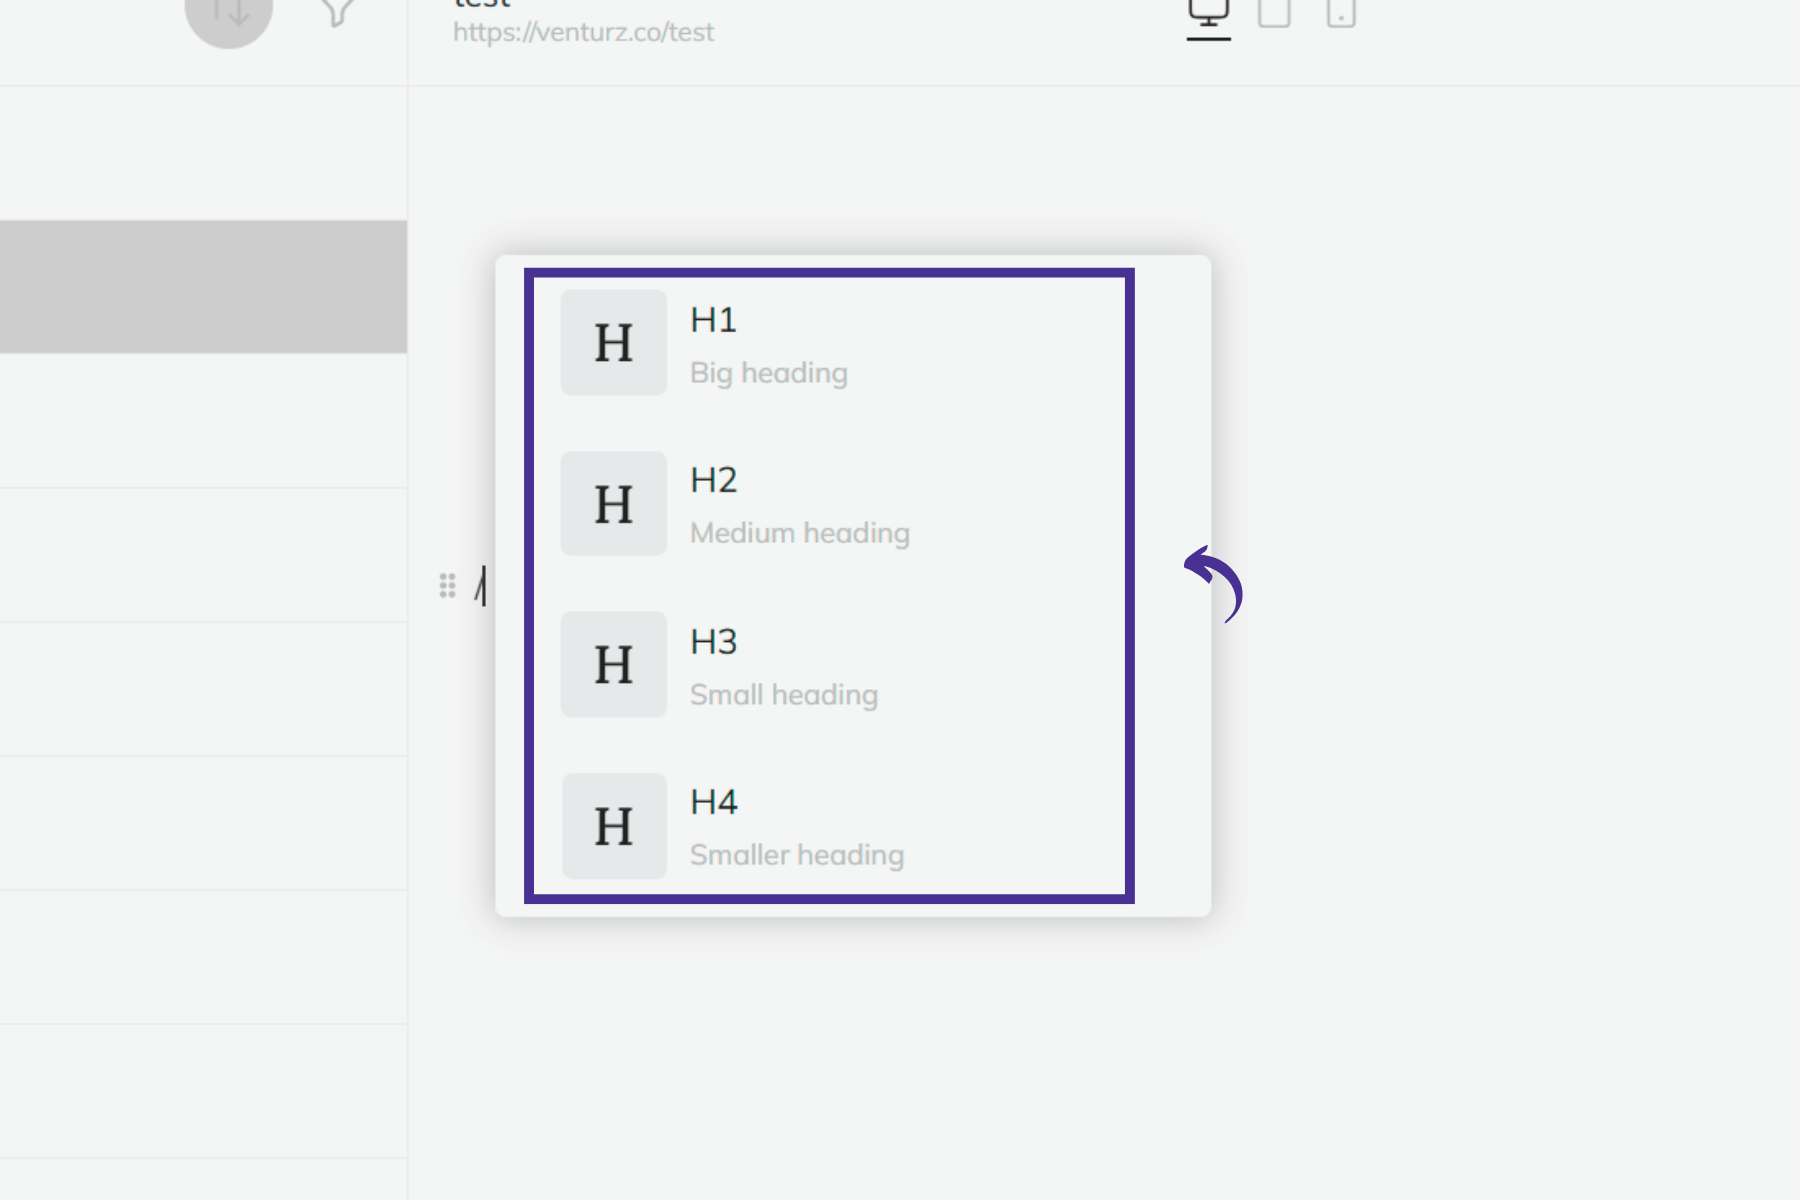
Use this block to add basic text content or headings. You can choose heading levels (H1 to H6) depending on the importance and hierarchy of your content.

This block allows you to generate content using AI. You can ask it to write text, suggest ideas, create images, generate videos, or improve existing content directly inside the editor.

Upload media files directly to your page. This block supports JPG, PNG, MP4, and other common formats to help you visually enhance your content.
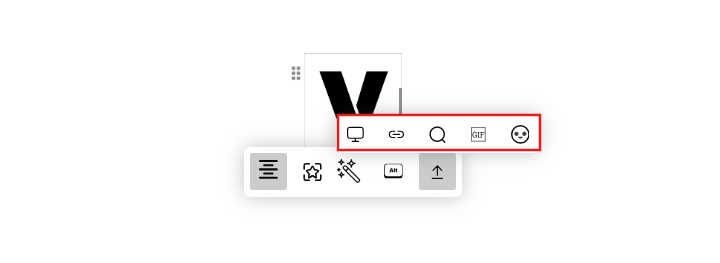
You can easily swap out the current image using several options:
- Upload your own image from your computer.
- Search from stock images.
- Generate using AI by describing the image you want.
- Add via URL if you have an image link you want to embed.
- Insert GIFs if you want animated visuals
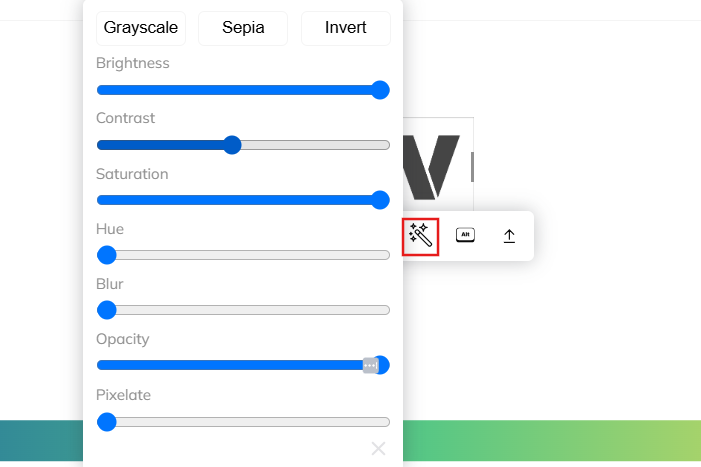
Click the magic wand icon to open advanced visual settings:
- Modify brightness, contrast, saturation, hue, blur, opacity, and pixelation.
- Apply quick filters like Grayscale, Sepia, or Invert.
These allow you to tweak how the image feels without needing external tools.
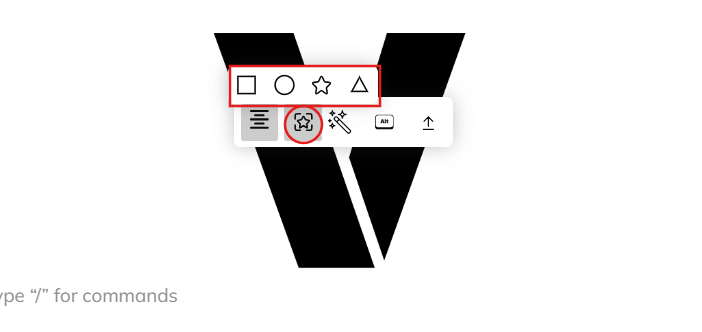
Customize the image frame by choosing from:
- Square
- Circle
- Star
- Triangle
This is useful for stylistic effects and to match your brand identity.
Use the toolbar above the image to:
- Align the image (left, center, right).
- Set Alt Text to help with SEO and accessibility.
You can easily adjust the size of any image using the side and bottom handles shown around the image block.
Simply click on the image and drag the handles to modify its width and height as needed.

Add clickable buttons that link to other pages, external URLs, or sections on the same page. You can customize the text, size, and design of the button.
Here's what you can customize:
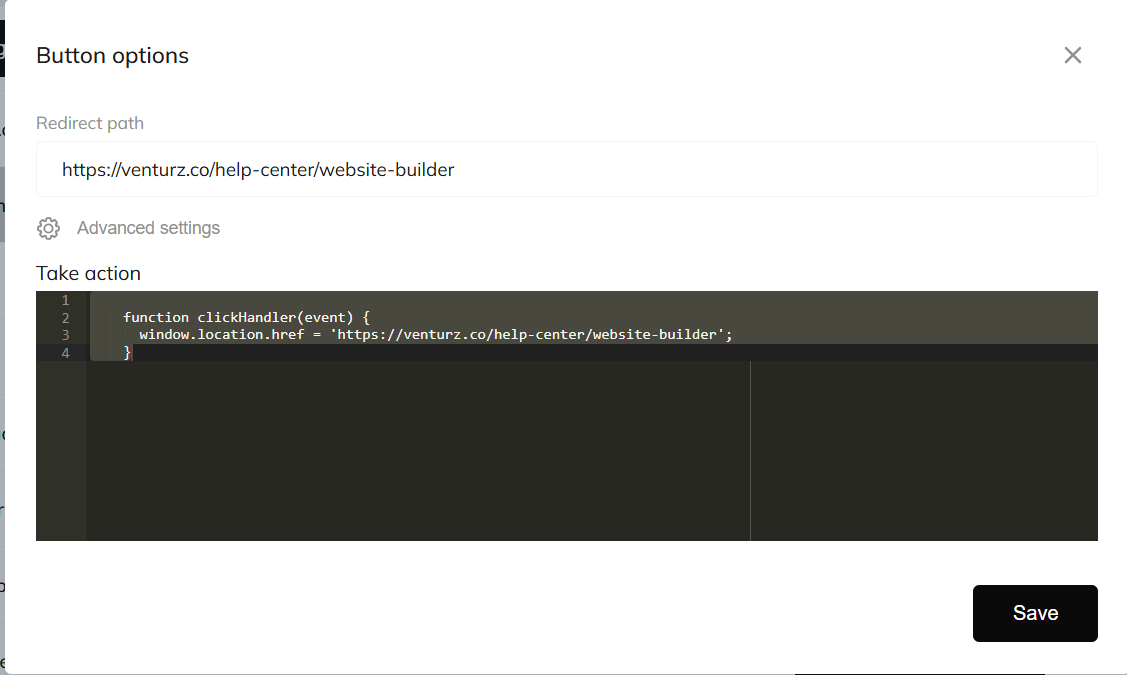
To link a button to a specific page, click the six dots (drag handle) on the button block. You'll see a URL option—paste your desired link there.
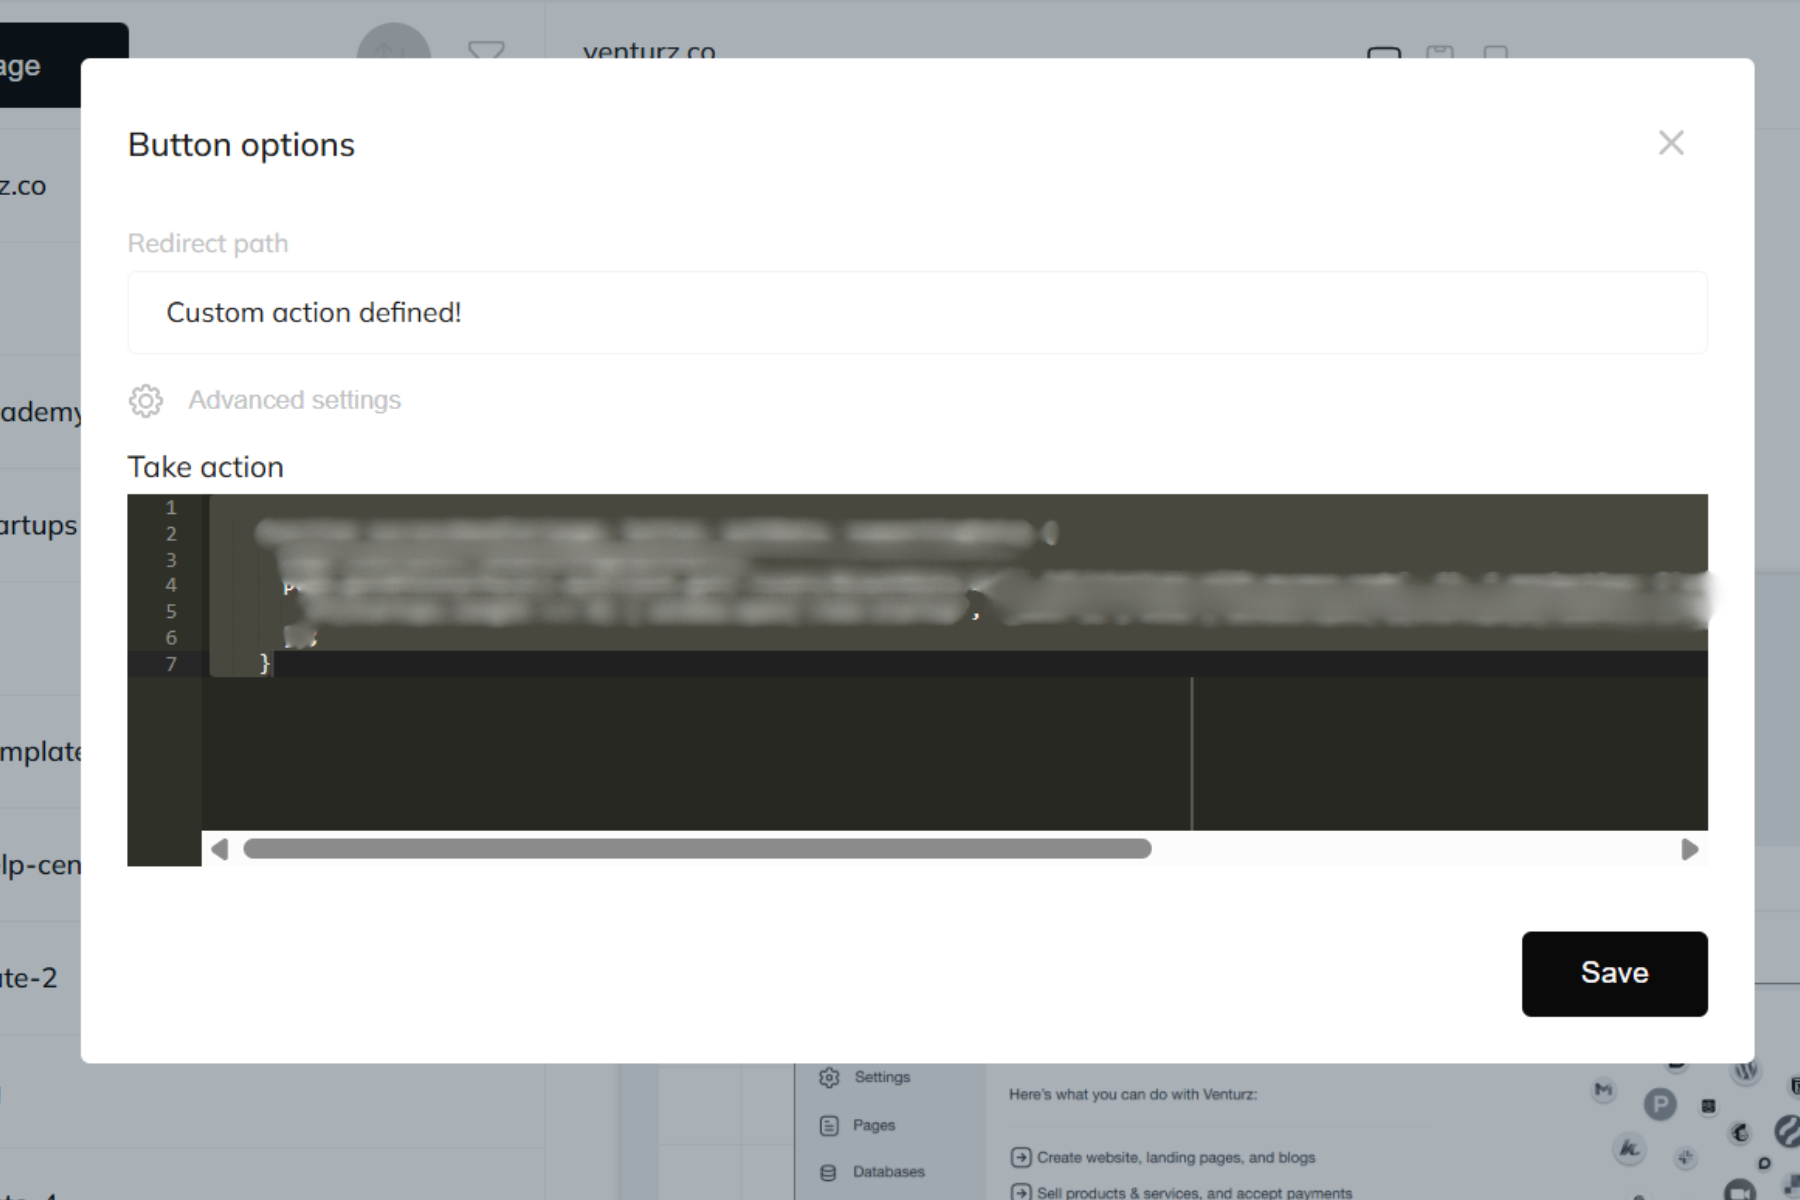
You can set a specific path where users should be taken after clicking the button. For example, you might send them to a signup success page, a specific product page, or any other internal URL, click on the edit icon on the button and in redirect path just paste you full url and click save.
If you're looking to trigger something more dynamic—like opening a modal, connecting with a third-party tool, or firing a custom script—you can define a custom action. Simply paste your code into the Take Action field shown under the “Advanced settings” section.

Use this block to embed Tweets, YouTube videos, Google Maps, or any other third-party content. Just paste the embed link, and it’ll appear on your page.

Visually separate sections of your content with a horizontal line. Helpful for improving structure and readability.

Organize content into lists. You can choose between bulleted points, numbered steps, or a checklist format for tasks.

Highlight a testimonial or an important message using the Quote block. Great for drawing attention to customer feedback or insights.

Use this block to split your content into multiple columns. Ideal for side-by-side comparisons or placing images next to text.

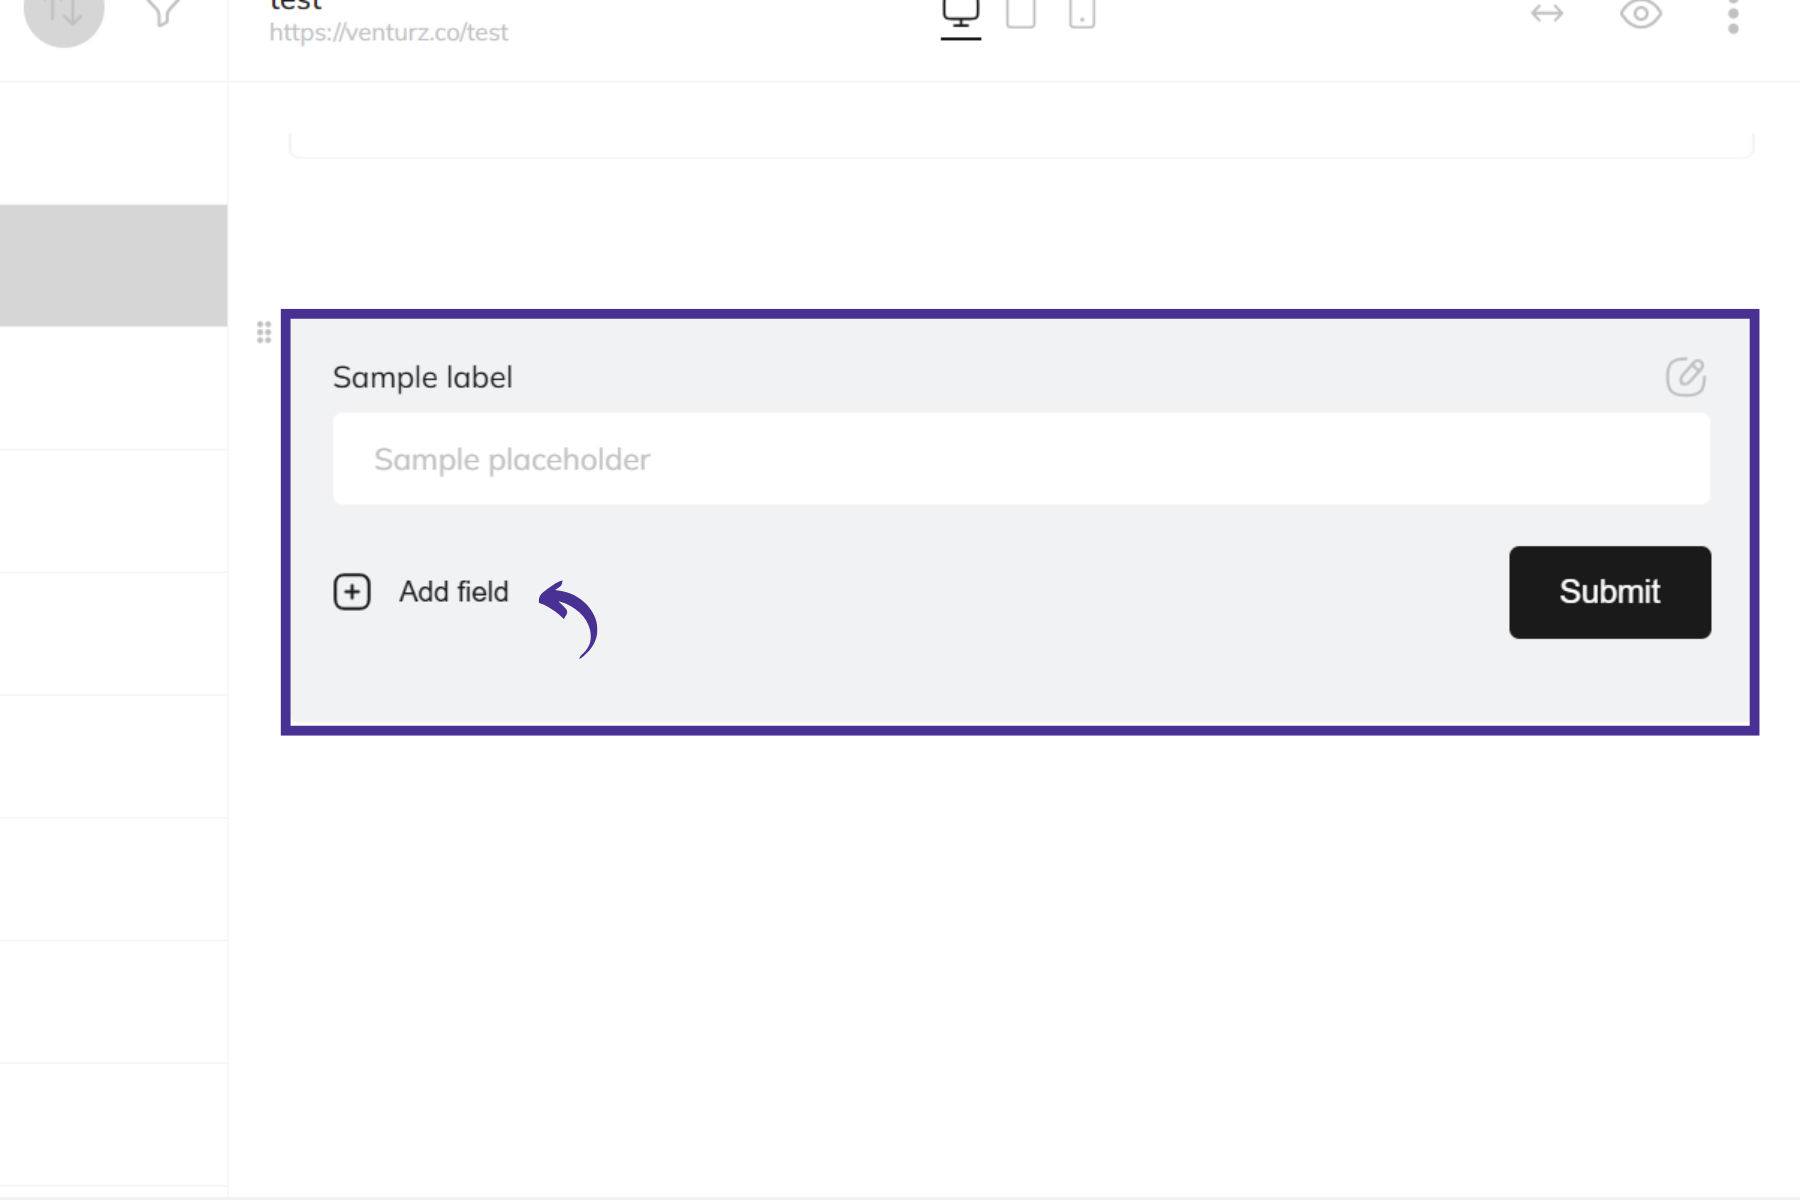
The Form block helps you collect information directly from visitors. Whether it’s a contact form, lead capture form, newsletter sign-up, or feedback form—you can place it anywhere on your site.
How to Use:
1. Type “/” and select the Form block.
2. Add the fields you want:
- Text field – for names or short answers
- Textarea – for longer messages
- Select – dropdown options
- Checkbox Group – for multiple selections
- Radio Button Group – for single-choice questions
- File Upload – allow users to upload documents or image
Field Options:
You can set minimum or maximum text lengths, and mark any field as required so it must be filled before submission.
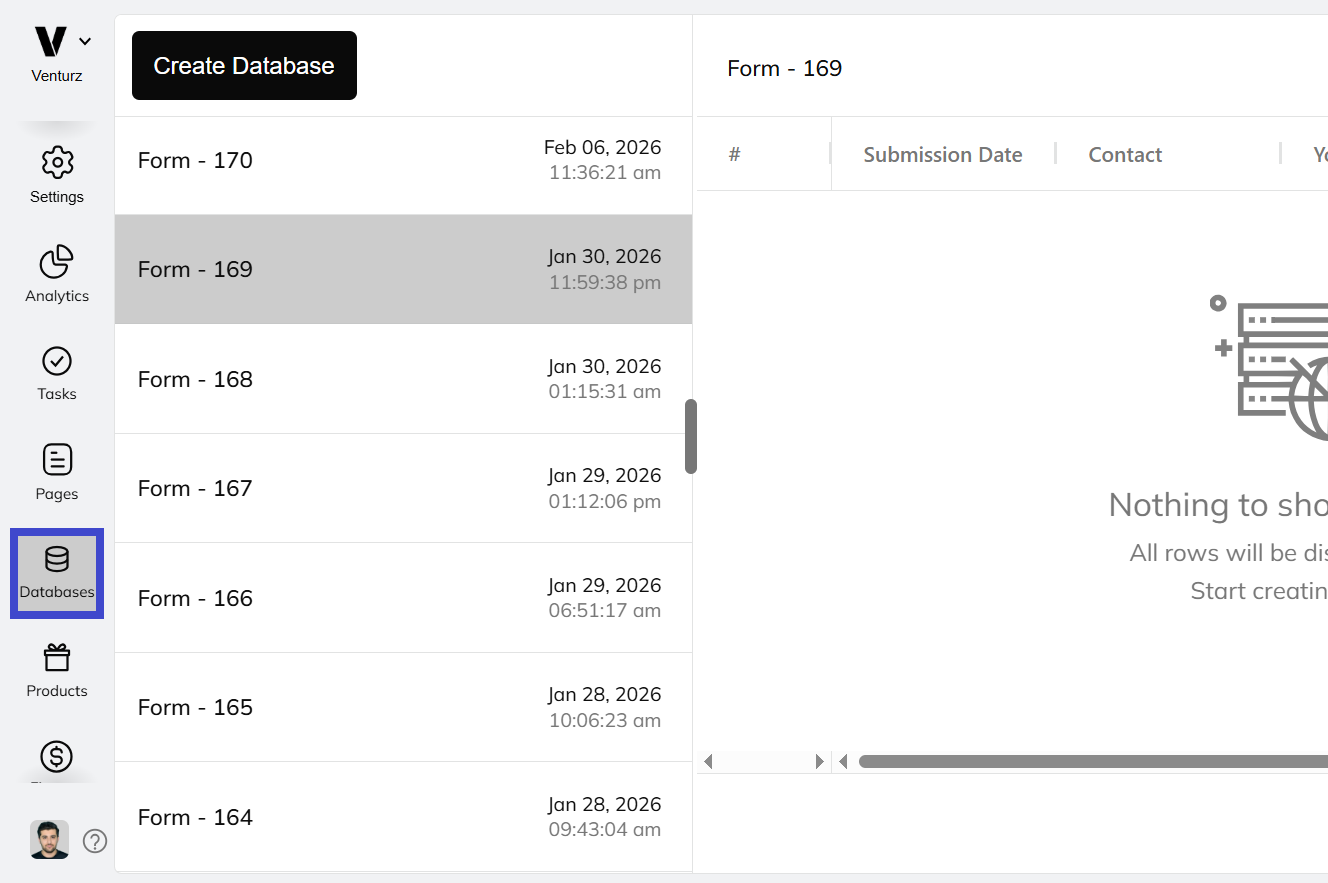
What Happens After Submission?
Each form automatically creates a linked database in your dashboard. This means:
- Every submission is stored safely.
- You can view and manage all entries under the Database section.
- Each unique form (e.g., newsletter vs. feedback) gets its own database, so responses are neatly organized.

If you have prewritten HTML code, paste it into this block to render custom layouts, widgets, or designs on your page.

The Canvas Block gives you full creative freedom to design custom graphics, layouts, or visual posts directly within your page—like using a mini design tool.
How to Use:
- Type “/” and select Canvas Block.
- You can drag, drop, resize, move, and arrange different elements (text, shapes, icons, etc.).
- Great for creating banners, flyers, visual content blocks, or announcement cards.
Export Options:
Once you’re done designing:
- You can download the final design as JPG, PNG, or SVG.
- Perfect for saving your designs, reusing them across your site, or sharing them on social media.
Real Use Cases:
- Design a promo graphic for an event
- Create a styled testimonial or team intro section
- Make a custom banner for a sales campaign

This lets you create custom video content. You can combine images, audio, and animations to build interactive videos right on the page.

The Signature block lets you collect signatures directly on your page. When you add this block, you'll be asked to select a user or enter an email address. You can also include an optional note for context.
Once added, Venturz automatically sends a link to the page where the Signature block is placed. The recipient can then open the link and provide their signature digitally. This is useful for collecting approvals, agreements, or acknowledgments without needing third-party tools.

Display the last modified date of the page. Helps visitors know how fresh or up-to-date the content is.

The Products block helps you showcase and sell your subscription-based products or one-time digital services.
How It Works:
First, go to your dashboard → Products to create your pricing plans. You can choose:
- One-time payment
- Monthly or yearly recurring subscriptions
- Usage-based limits (like number of queries or access tokens)
How to Add It on Page:
- The block will show Call-to-Action (CTA) button with name so visitors can subscribe or purchase.
You can than design pricing layout using regular blocks (columns, headings, text), then drop the CTA button.
What Happens After Purchase:
- The transaction details appear in your Finance Dashboard.
- The user gets access to the selected plan right away.

Use this block to add structured data in a row-and-column format. Ideal for comparisons, pricing breakdowns, or schedules.

The Member Calendar block allows you to display your availability so visitors can directly book appointments with you—or with any of your team members.
How It Works:
The calendar pulls data from the availability schedule you set under your Profile → Availability. That’s where you define your working days, time slots, time zone, and meeting preferences.
How to Add It:
- You’ll be prompted to select which team member’s calendar to show (helpful if you’re a team).
What Visitors Will See:
- The calendar will show open time slots.
- Visitors can choose a time, enter their info, and book a meeting—without leaving your site.
What Happens After Booking:
- You and your team get notified. No extra tools or setup needed.

Showcase the author of the content. Useful for blogs or team pages where attribution is important.

The Database View block lets you display dynamic content pulled directly from your internal database—like listings, customer testimonials, blog entries, product collections, and more.
How to Use:
- Type “/” and select Database.
- Choose a database you’ve already created or imported.
- Design how each item (row) should appear—select columns to display as titles, images, prices, etc.
- You can style the output visually just like any other section of the page.
Use Case Examples:
- Show a list of events stored in your database
- Display form submissions (like public testimonials or entries)
- Auto-populate team profiles or product listings
Each row in your selected database turns into a styled, live section on your website—no need to copy-paste or update manually.
Once your database is created in Venturz, you can fully manage its structure—add or edit rows and columns, update field types, export data, and delete entries.
1. Adding Rows and Columns
You can expand your database by adding more rows (data entries) and columns (fields). Here's how each works:
Add New Rows (Entries)

To add a new row to your database:
- Scroll to the bottom-left corner of the database view.
- Click the “Add new entry” option.
- A blank row will appear where you can enter new data manually.
This is ideal when you want to input one entry at a time without uploading a file.
Add New Columns (Fields)

To create a new column:
- Go to the top-right corner of the column header section.
- Click the plus (+) icon to add a new column.
- You'll be prompted to enter a column name and choose the data type (e.g., text, date, file)
2. Editing Columns

Each column has an edit option (shown as a pencil icon next to the column name).
Clicking this allows you to:
- Rename the column (e.g., change “Name” to “Full Name”)
- Change the field type (e.g., from text to date or file)
This helps ensure your database remains organized and uses the correct data format.
3. Deleting Rows

To delete a row from your database:
- Look to the far-right side of the row you want to remove.
- Click the trash icon to delete the entry.
Be cautious—deleted rows are permanently removed and can’t be recovered.
4. Exporting Your Database

You can export your data at any time if you need a backup or want to work with the data externally.
Go to the top-right menu of your database and select export. You can choose between:
- CSV format – compatible with most tools like Google Sheets and CRMs
- XLSX format – Excel spreadsheet file

The Code Block allows you to embed custom HTML, CSS, or JavaScript directly into any section of your page. It's useful if you want to add third-party widgets, tracking scripts, or custom functionalities not covered by standard blocks.
Just paste your code inside the block, and it will be rendered on your live website exactly as written. This gives you more control and flexibility to personalize your site.
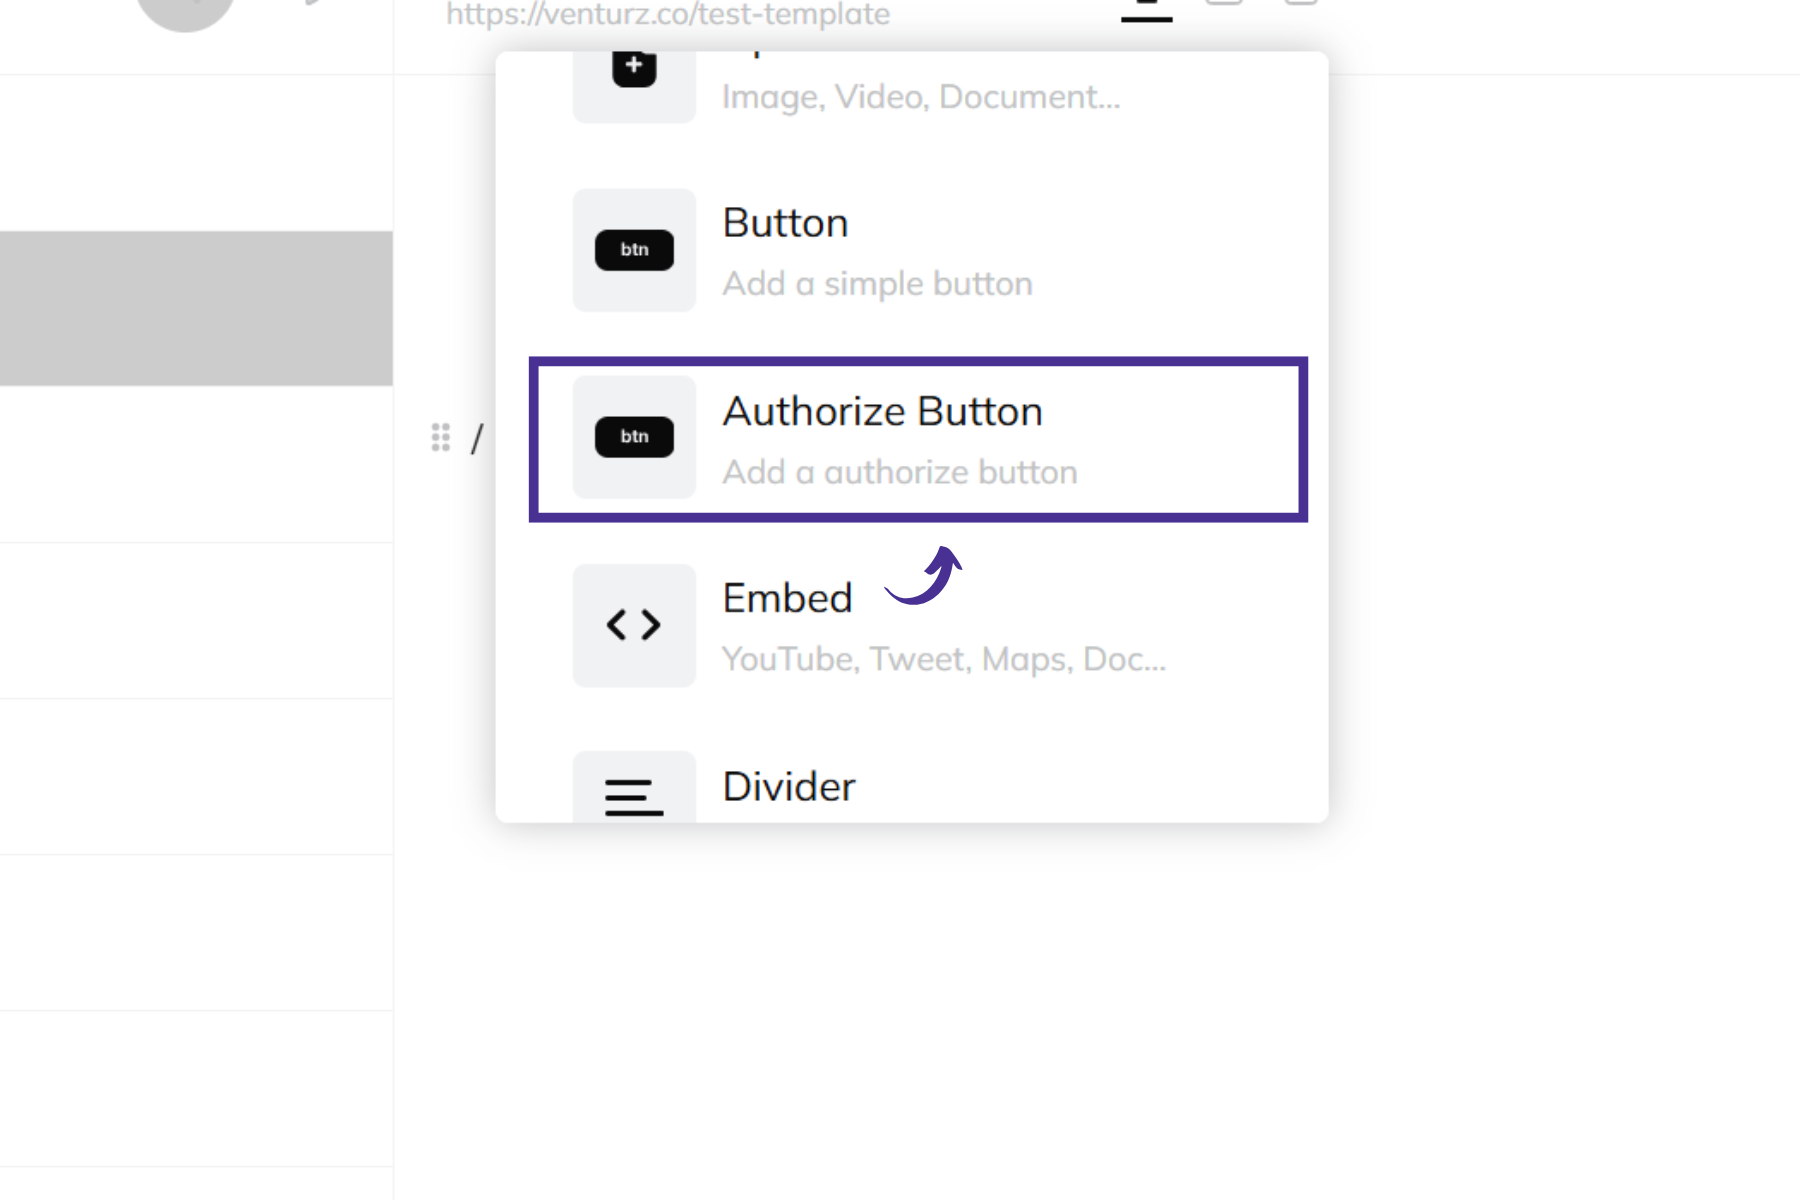
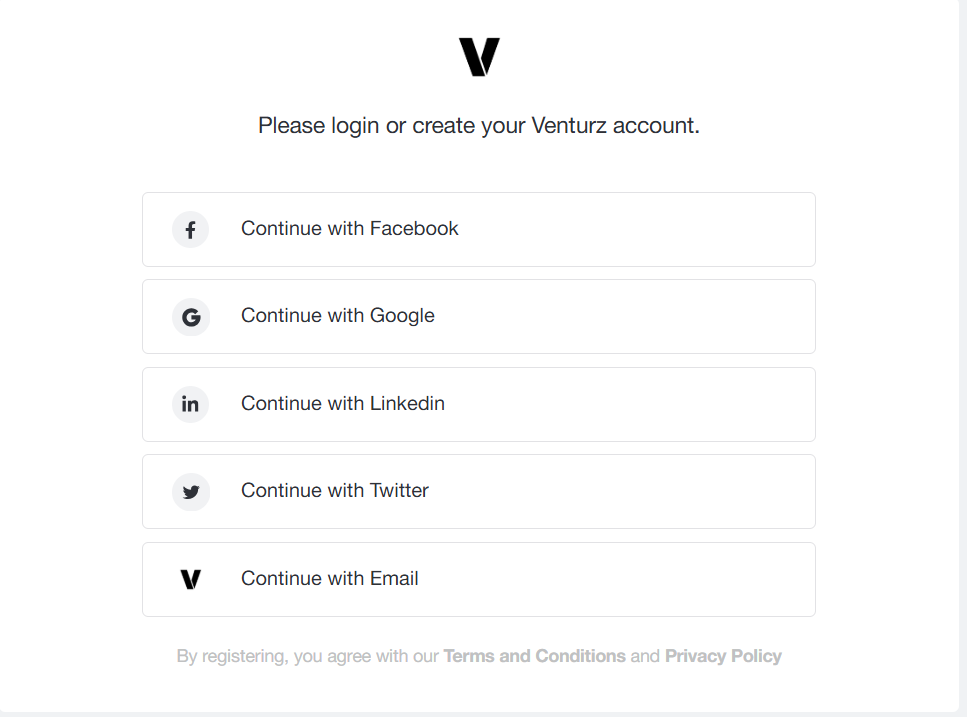
The Auth Button Block lets you add a login or signup button directly on your website. It’s a simple way to let your visitors access their workspace or join your platform.
What Happens by Default
When you drag and drop the /Auth Button Block, users who click it will see a login popup. This popup shows multiple sign-in options:
- Continue with Facebook
- Continue with Google
- Continue with LinkedIn
- Continue with Twitter
- Continue with Email
After selecting an option, users confirm their email and set a password.
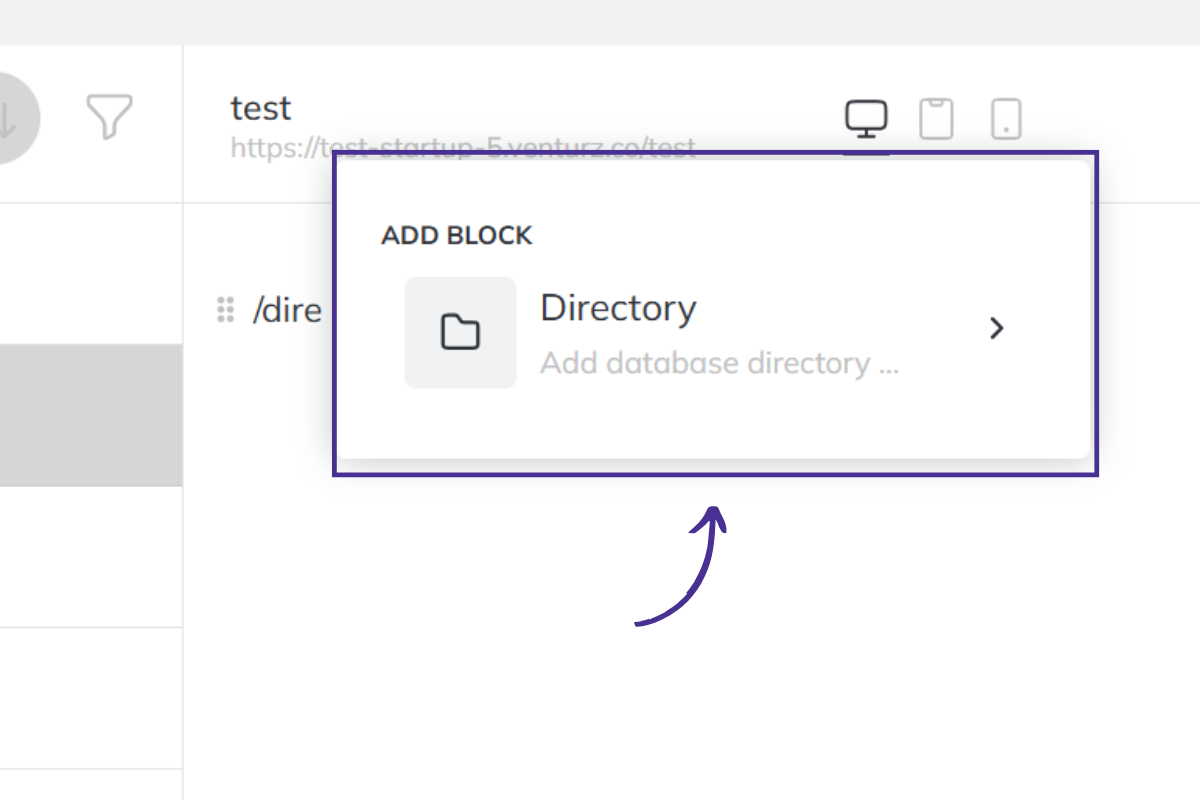
The Directory Block allows you to display dynamic content from your database in a clean, searchable format.
Here’s how to use it step-by-step:
Step 1: Add the Directory Block
While editing your page, type “/” and select Directory Block from the list.
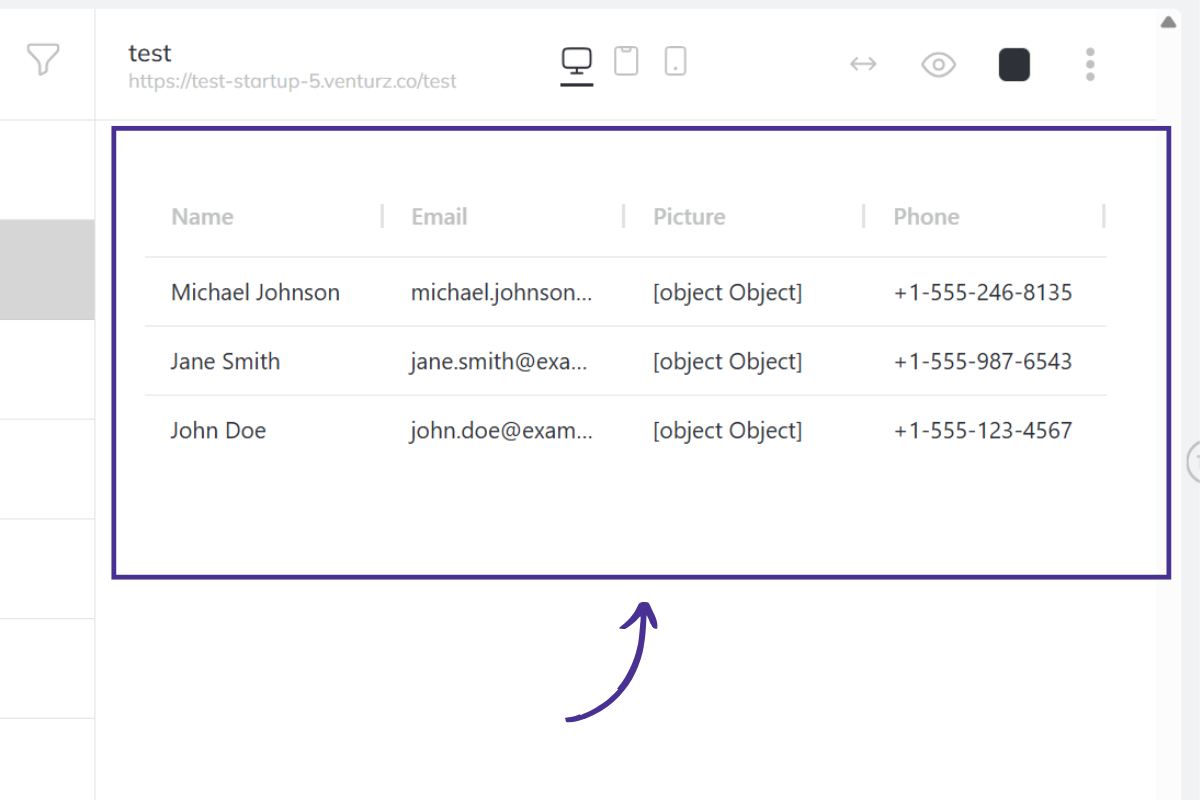
Step 2: View Table-Style Layout
Once the block is added, you’ll see a table-style directory layout.
Each row in the table pulls data from your connected database, showing fields like Name, Picture, Phone Number, etc.
Step 3: Filter and Choose Columns
You can choose which fields (columns) to show in your directory.
For example, display only the Name, Email, and Phone Number, or add other fields depending on your database.
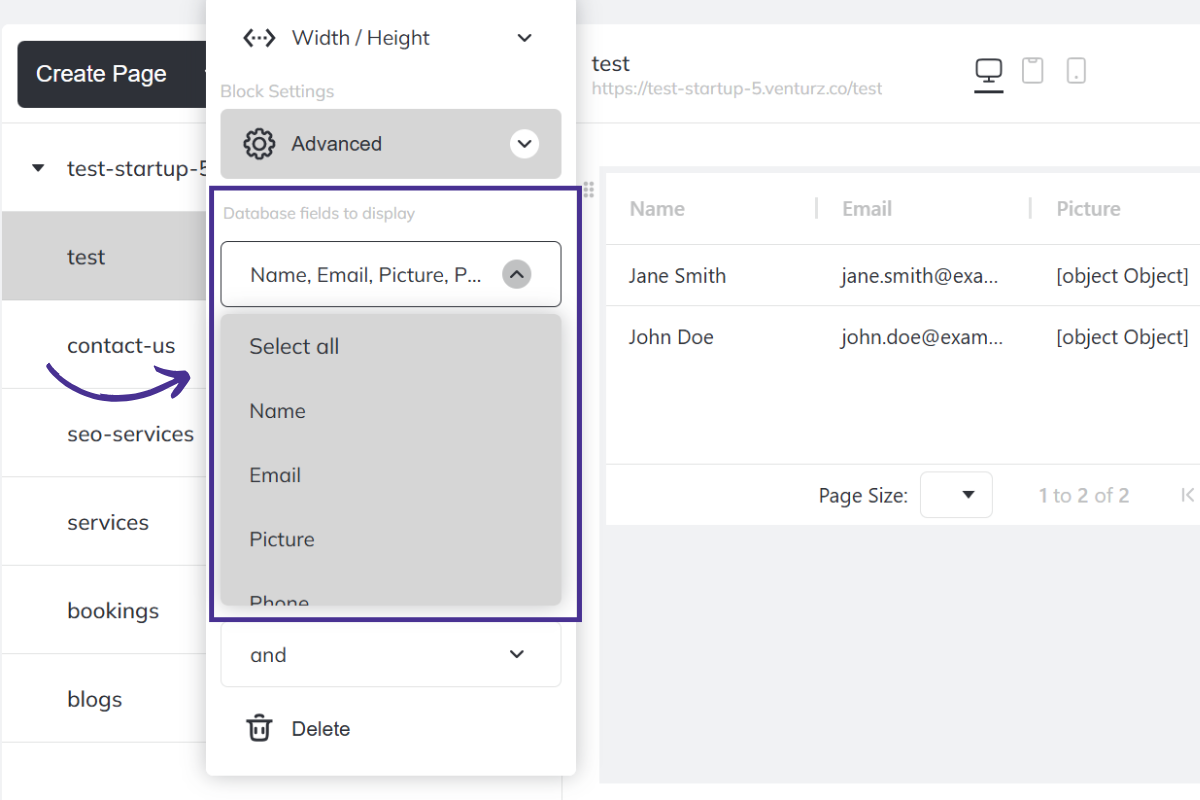
Step 4: Control Row Details
You can choose how much information appears in each row — and which specific people’s data should be shown.
Customize the Auth Button
Once a user has signed up or logged in using the Auth Button Block, you can customize what happens next.
Head to edit icon on the button to configure the following:
1. Redirect Path
Set the destination where users should land after logging in. This could be a thank-you page, a gated content section, or any internal route like /dashboard or /welcome.
2. Custom Action
If you want to trigger a custom process—like opening a popup, sending data to an external tool, or running a script—you can add your code in the Take Action section under Advanced Settings.
This allows you to fine-tune what happens post-login, making the button smarter and aligned with your specific funnel or workflow.
Once you've added content blocks to your page, you can customize them to match your layout and style.
To customize a block:
- Hover over the block and click the six dots icon on the left side.
- A settings menu will appear where you can adjust the block’s design and behavior.
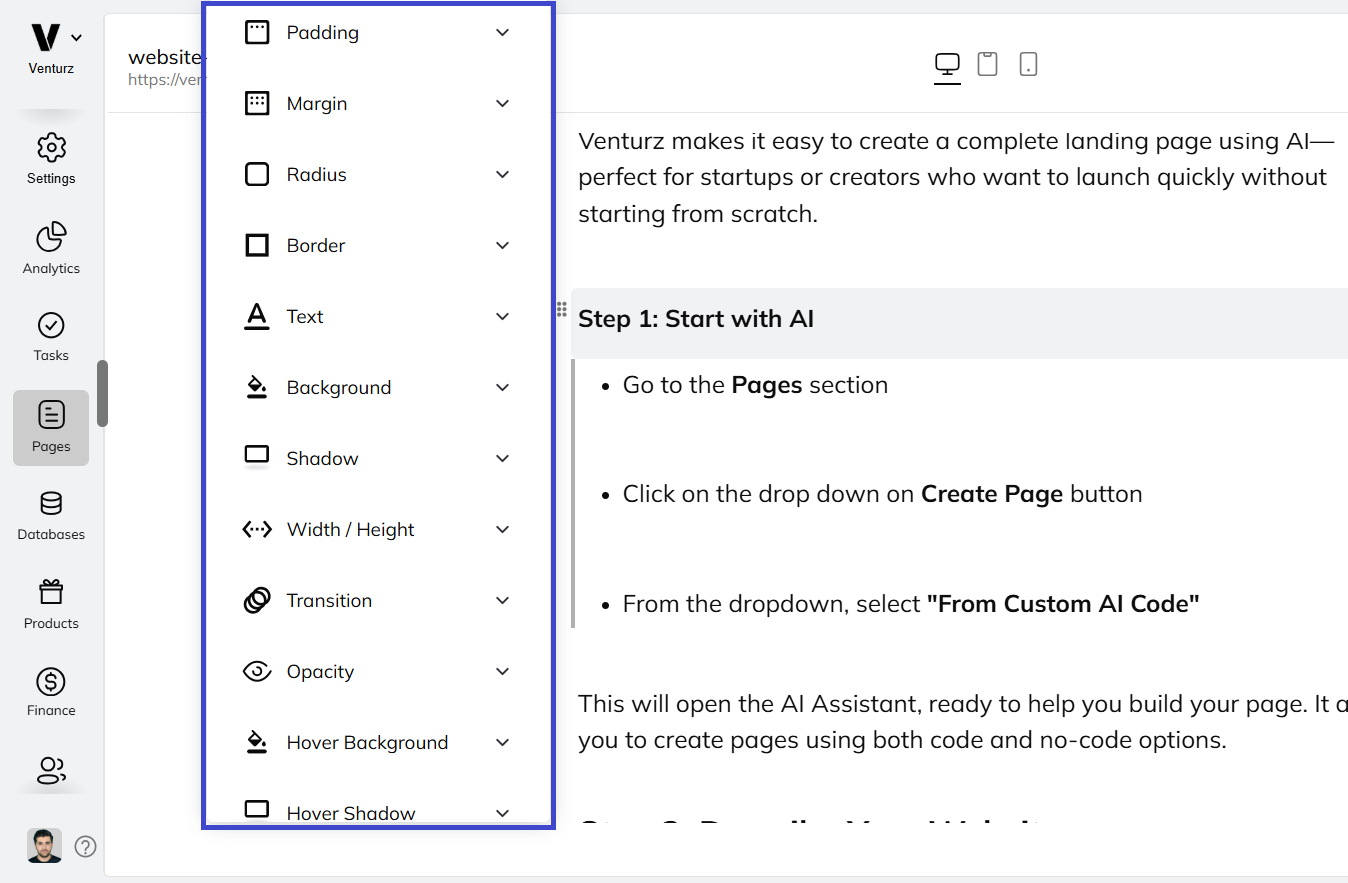
Customization Options Include:
- Padding – Adds space inside the block, between the content and its edges.
- Margin – Adds space outside the block to separate it from other blocks.
- Radius – Rounds the corners of the block.
- Border – Adds a line around the block and lets you adjust its style.
- Text – Changes the text color.
- Background – Changes the background color or background style of the block.
- Hover Background – Changes the background when someone moves the cursor over the block.
- Hover Text – Changes the text style on hover.
- Shadow – Adds a shadow around the block.
- Width / Height – Adjusts the size of the block.
- Alignment – Changes how the content is aligned inside the block.
- Transition – Makes style changes appear smoothly instead of instantly.
- Opacity – Controls how transparent or solid the block looks.
- Hover Shadow – Adds or changes the shadow when the block is hovered over.
- Hover Opacity – Changes the transparency of the block on hover.
- Hover Radius – Changes the corner roundness on hover.
- Hover Transform – Adds a hover effect like move, scale, or similar motion.
- Duplicate – Creates a copy of the block.
- Favorite – Saves the block as a favorite for quick access later.
- Turn into – Changes the current block into another block type.
- Delete – Removes the block.
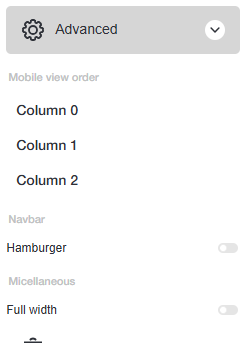
If you've added multiple columns in your section, you’ll see the Advanced Settings option appear when you click on six dots in the drag handle. This section is designed to help you customize how your content behaves on mobile devices.
The Advanced tab gives you more control over how your block behaves on mobile and across different screen sizes. Here's what each option means:
Use this to change the order of columns on mobile view.
For example, if your desktop layout has Column 0, Column 1, and Column 2—but you want Column 2 to appear first on mobile—just drag Column 2 to the top of the list. The mobile layout will update accordingly.
This option applies to navigation blocks.
Enabling this turns your full menu into a hamburger icon (☰) on mobile, saving space and improving the user experience.
Use this to stretch your content block across the full width of the screen.
It's especially useful for banners or hero sections where you want edge-to-edge visuals with no side padding.
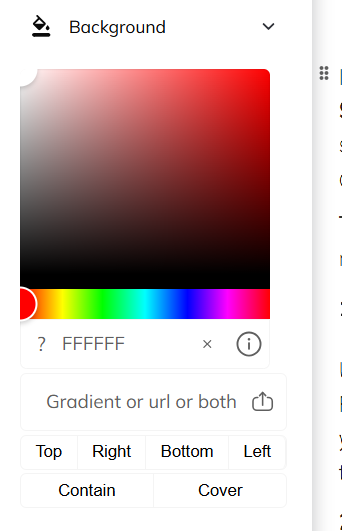
When customizing a block, you’ll find the Background option in the drag handler that appears when you click on the six dots. This allows you to change the background using a solid color, gradient, or image.
You can choose any color from the picker or enter a HEX code manually (e.g., #FFFFFF for white).
To apply a gradient, paste your gradient code in the “Gradient or URL or both” input field.
Make sure it follows the correct CSS format.
Example: linear-gradient(90deg, rgba(0, 85, 165, 1) 0%, rgba(24, 137, 195, 1) 50%, rgba(192, 192, 192, 1) 100%)

Example 2: radial-gradient(circle,rgba(10, 10, 10, 1) 25%, rgba(0, 0, 0, 1) 50%, rgba(241, 242, 244, 1) 100%)

Click the upload icon in the same field to choose and upload an image from your device.
Once uploaded, you’ll get layout options:
- Cover – This stretches the image to cover the entire block area (cropping parts if needed).
- Contain – This keeps the full image visible but may leave empty space if it doesn't fit the dimensions.

Click on the six dots (block handle) to open block settings.

Click on the "Duplicate" dropdown.

From the options, select "With sync". Then click on "Select pages" and choose "Select all" to apply it to every page.

This will ensure your header stays consistent across the site.
- Click on the six dots (block handle) on the block you want to favorite.
- Select the "Favorite Block" option.
- You’ll be asked to save a label for easy reference — add a name you’ll remember.
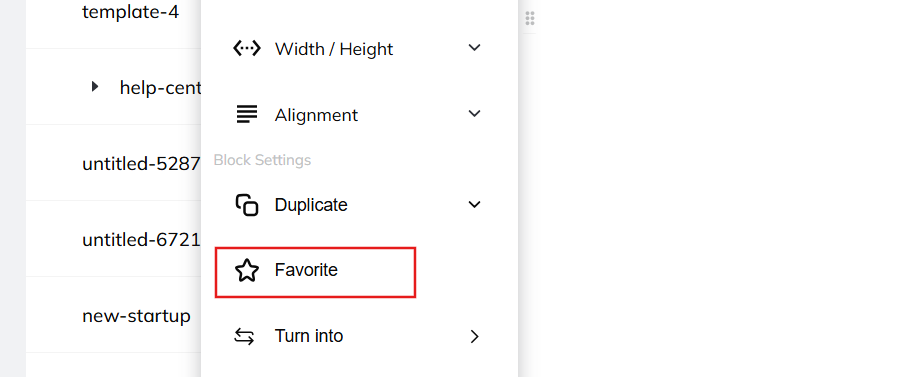
Using Your Favorite Block
- In the editor, type “/” and scroll down.
- You’ll see a section called “Favorite Blocks.”
- Choose the block you saved — once you click it, it will appear on your page.


When you select any text inside a block, a text formatting toolbar will appear.
Formatting Options Include:
- Bold
- Italics
- Underline
- Strikethrough
- Bullet Lists
- Quotes
- Text Alignment (left, center, right)
- Hyperlinks – Link any text to a URL
- Text Color – Change the color of selected text
- Highlight – Add background color behind text
- Font Type & Size – Choose from available fonts and adjust the size
This toolbar helps you style your content quickly and keep everything readable and on-brand.

To manage your page settings, click the three-dot menu in the top-right corner of the editor.
Here’s what you can do from there:
General Settings:
- Page Path – Edit the URL of your page (e.g., /about, /pricing)
- SEO Title & Description – Add SEO-friendly titles and descriptions for search engines
- Social Title & Description – Set custom title and description for social sharing
- Social Graph – Set how your page appears when shared (title, image, and description)
- Header Links – Choose which navigation links show on this page
- Page Width – Adjust the width of your page layout
- Visibility – Set your page as: Public, Private, Team Only
- Live Chat – Enable or disable live chat on this page.
- Table of Content – Automatically generate a content outline for long pages.
- Redirect Path – Add a redirect URL for this page if needed.
- Export Options – Export the page as HTML, Markdown, or PDF.
- Use as Template – Save this page layout to reuse for new pages
Version History:
Venturz automatically keeps a backup every time you make changes.
- Click Version History to view older versions of the page
- You can easily restore a previous version if needed
Venturz makes it easy to create a complete landing page using AI—perfect for startups or creators who want to launch quickly without starting from scratch.
- Go to the Pages section
- Click on the drop down on Create Page button
- From the dropdown, select "From Custom AI Code"
This will open the AI Assistant, ready to help you build your page. It allows you to create pages using both code and no-code options.
If you want a coded layout with detailed control, you can ask the AI to create a custom landing page.
Make sure to include the words like custom, code, or HTML in your prompt.
Example prompts:
- “Create a custom SaaS landing page with HTML and CSS for a product analytics tool.”
- “Generate a coded layout for a startup homepage with three sections.”
The AI will generate code in the editor that you can preview and customize.

If you prefer the no-code option, simply write a natural language prompt without mentioning words like custom or code.
The AI will instantly create a full-page layout you can visually edit.
Example prompts:
- “Create a landing page for an AI writing app.”
- “Build a homepage for a digital marketing agency.”
- “Design a website for a yoga studio with pricing and contact section.”
- “Make a landing page for a free online course platform.”
These no-code pages are automatically loaded into the editor, and you can easily update text, design, and structure.
Once the page is generated, you can edit and adjust everything to fit your style and message.
You can:
- Edit text directly using the rich text editor (formatting, links, color, etc.)
- Replace or update images and videos
- Use the “/” slash command to insert more content blocks like buttons, forms, testimonials, pricing, and more
This gives you full control while saving time on layout and writing.
Venturz offers a range of ready-made templates to help you build pages quickly.
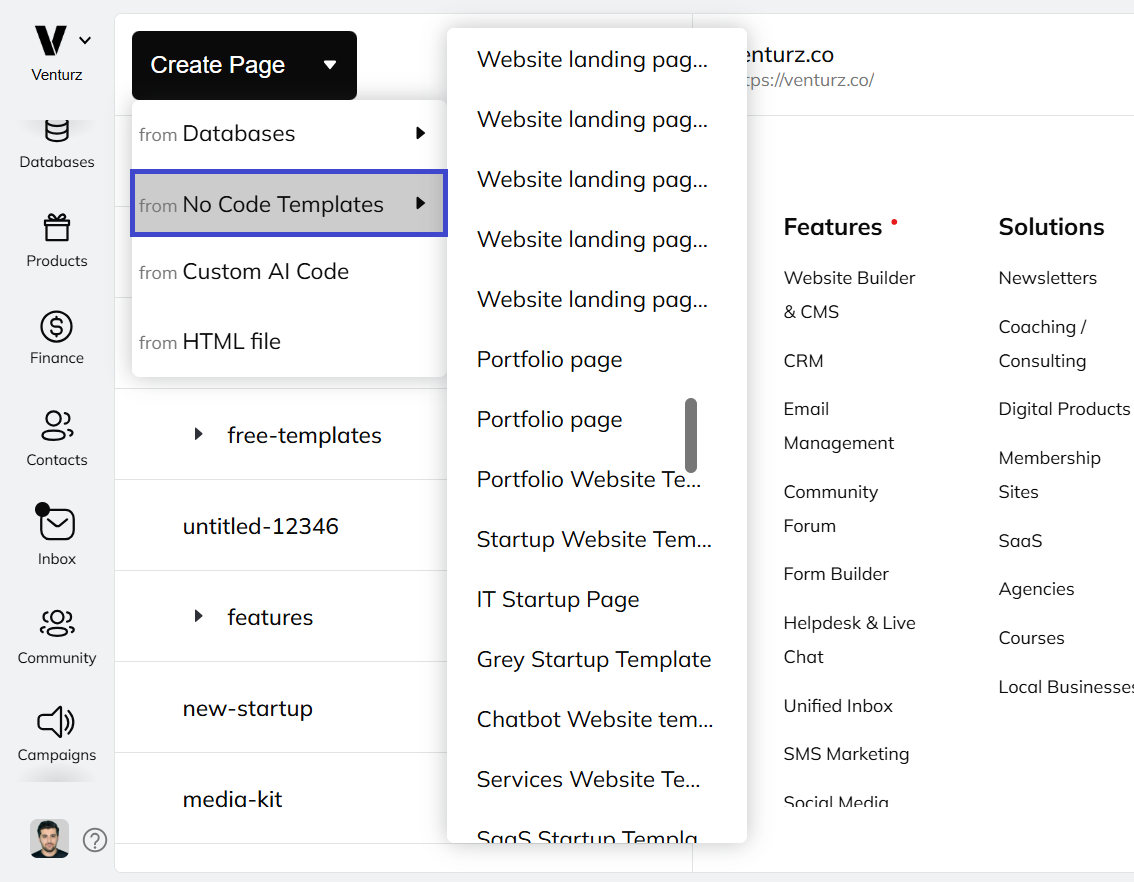
- Go to the Pages section
- Next to the Create Page button, click the dropdown arrow
- Select “From No Code Templates”
You’ll see a variety of built-in templates provided by Venturz. Browse the options and choose the one that best fits your needs.
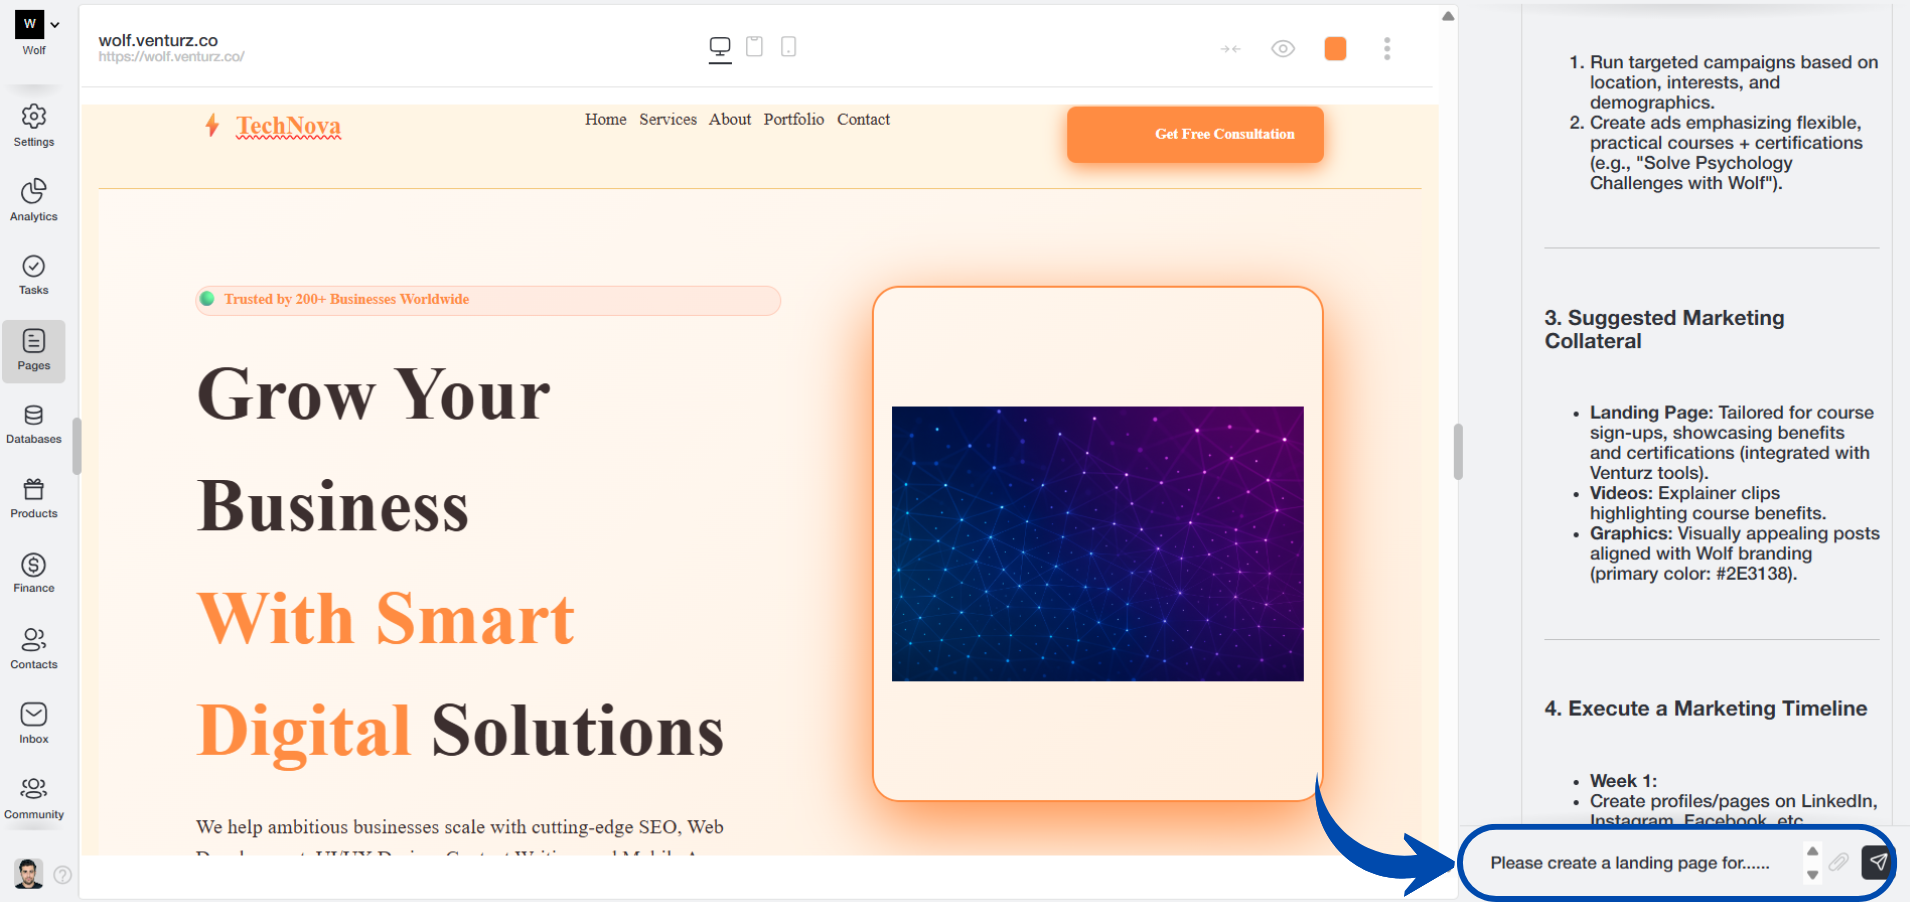
After you select a template, an AI Assistant box will appear. In the chat, you’ll see a message like:
“Using the template: {template name you selected}...”
Right after this message, type your prompt to help the AI personalize the content. For example:
“We run a productivity app for remote teams that helps them manage tasks, meetings, and internal notes. Create a page that explains the features, shows benefits, and ends with a CTA to start a free trial.”
The AI will then auto-generate the page content by replicating the template layout and customizing the copy for your business.
After the template loads, you can edit and personalize everything.
You can:
- Change text using the rich text editor
- Replace images or videos with your own content
- Use the “/” slash command to add blocks like buttons, lists, pricing tables, forms, or testimonials
Templates help you move fast, and you still have full flexibility to adjust the layout and content as needed.
*Note: Times new Roman is the default font for templates, but if you create a page using any of the templates it should load as per your chosen font in Settings > Branding.
With Venturz, you can easily add forms to any page to collect leads, feedback, or any custom data. Forms are fully connected to your CRM, so every entry is automatically stored and accessible in your dashboard.
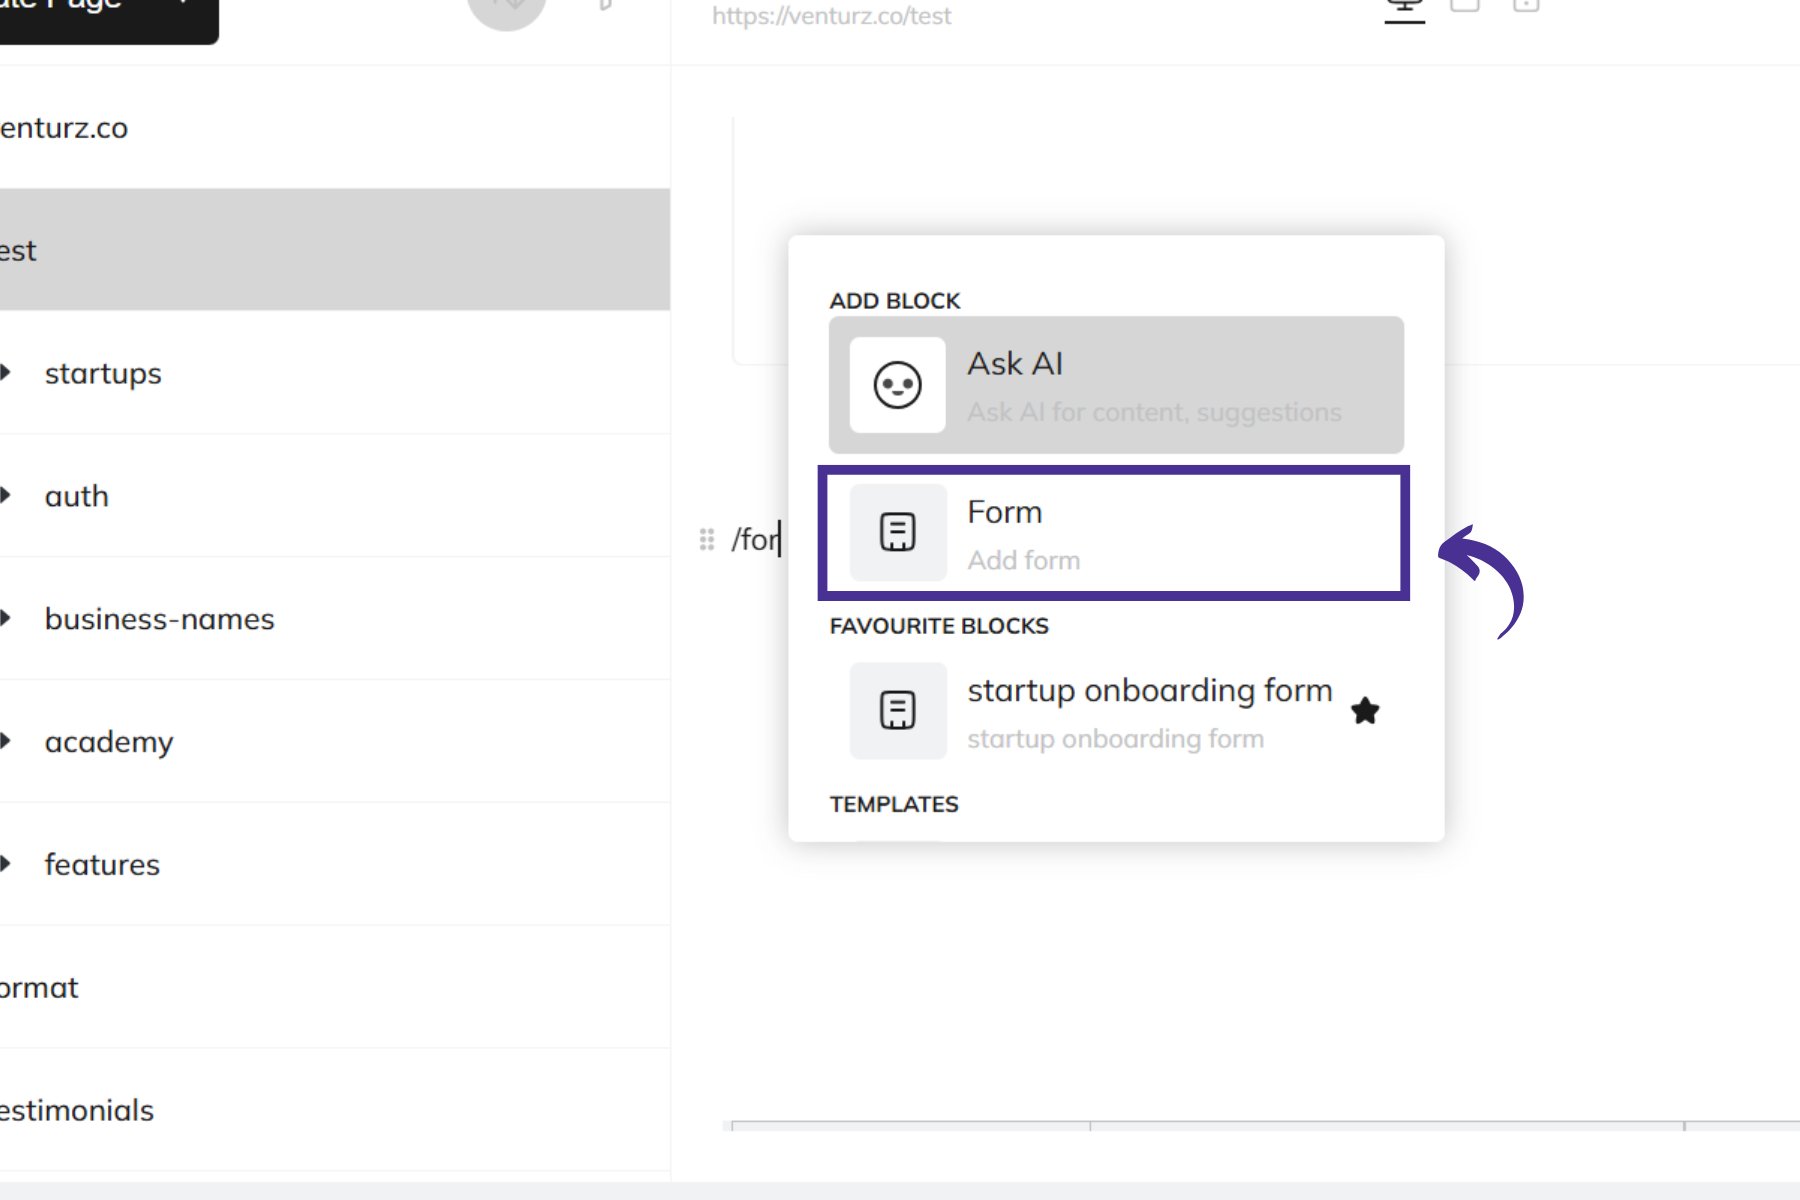
- While editing any page, type “/” and select the Form block
- A default form will appear on the page
- You can customize the form by adding the fields you need
Inside the form block, you can add different types of fields depending on the information you want to collect. Available field types include:
- Text – For single-line input like names or emails
- Text Area – For multi-line responses (e.g., comments, messages)
- Select Dropdown – Let users choose from a list
- Checkbox Group – Allow users to select multiple options
- Radio Button Group – Users select only one option
- File Upload – Let users attach files (e.g., resumes, images)
You can also:
- Set minimum and maximum lengths for text inputs
- Mark fields as required so users must fill them before submitting
Every time a user submits a form:
- The data is saved directly to your Venturz CRM
- You can access it from the Dashboard → Databases section
This makes it easy to manage leads, track submissions, and follow up—without needing any extra tools or setup.
Creating hundreds of pages manually is a daunting task—but with Venturz, you can automate this entire process by using the database-to-pages feature. This guide walks you through the entire process, from setting up your database to generating pages and controlling their structure.
To begin, you need to build a database that will act as the source for your pages.
You can do this in two ways:
Manually creating the database inside Venturz:
Go to your Dashboard → Databases. Start by adding a new database and then manually define your columns and rows. The columns represent the content elements of your pages—these could include fields like seo_title, meta_description, H1, H2, focus_keyword, and any other content you wish to display on each page. After setting up the structure, you can begin entering data row by row. Each row in the database represents one page.
Uploading a CSV file with your data:
If you already have your data organized, preparing it in a spreadsheet (e.g., Excel or Google Sheets) and exporting it as a CSV file is the fastest method. Your CSV file should contain clearly labeled columns, just like in the manual method. Once you're ready, go to the Databases section in your dashboard and upload your CSV. Venturz will automatically convert your data into a usable internal database.

Once your database is ready, go to the Pages section in your dashboard. Click the dropdown next to the “Create Page” button. From this dropdown, select “From Database.”
You will then see a list of the databases you’ve created or uploaded. Select the one you want to use for page generation.
Venturz will immediately recognize the number of rows in your database. If your database has 100 rows, then 100 unique pages will be created automatically. Each page corresponds directly to one row of data.
This process is completely automated. You do not need to copy-paste or manually set any of the individual page content during generation.
Venturz uses a single shared template to manage all pages created from a database. This means you cannot customize pages individually—they are all rendered using the same layout and design structure.
If you want to change the layout, structure, or general content formatting for all pages, you simply need to edit one page. Any changes made to this shared template will be applied automatically to all other pages that were created from the same database.
This ensures consistency across your pages, but also means you should be thoughtful about your design. The only variations across pages will come from the unique content you have added in your database rows.

When you're editing the generated page template, you’ll see a settings icon (usually at the top of the page editor). Clicking on it will allow you to define which fields (i.e., columns from your database) should be displayed on the page.
You can enable or disable specific content blocks depending on your needs. For example, you may choose to show the H2, focus_keyword, or even a specific image or quote field depending on what’s available in your data.
Additionally, you can control the number of rows to display on a page if you're showing grouped data or related items.

One of the most powerful aspects of database-generated pages is the ability to set SEO metadata and URL slugs dynamically.
To do this, go into the Page Settings of your generated template (you’ll find this in the top-right corner, represented by three dots).
In this settings panel, you’ll notice that fields like:
- Page Title
- Meta Description
- URL Path
Each come with a dropdown menu. These dropdowns will list the column headers from your database. That’s why your column names matter.
You should now select the appropriate column for each field:
- If you have a column named seo_title, you can assign it to the Page Title.
- If you have meta_description, use it for the Meta Description.
- A slug or url_path column will determine the final URL of each generated page.
Once set, Venturz will dynamically pull data from each row and fill these fields accordingly, creating optimized, structured pages at scale.
After making these configurations, your pages might not update immediately. It usually takes around 5–10 minutes for all changes to fully reflect across your site.
Venturz handles the synchronization in the background, ensuring everything is properly rendered. So, don’t worry if you don’t see immediate results—just give it a moment.
This feature is ideal for creating large volumes of similar content quickly—like service pages, blog posts, product listings, or any content type with structured data. The key to success is in how well your database is prepared and how effectively you set up your shared template.
If you ever need to change content or improve SEO elements across hundreds of pages, all you need to do is:
- Edit the template once.
- Update the source database if necessary.
- Let the system re-sync.
Totally white-labeled — No Venturz branding on your website or landing pages for paid plans. You have full control over the look and feel, including custom domains, logos, colors, and more.
Yes. All websites built with Venturz come fully hosted. That includes:
- Free SSL certificate
- Fast load times
- Built-in SEO optimization
- Automatic backups
You don’t need external hosting — we take care of everything so you can focus on your business. You can also connect your own custom domain anytime.
Yes. You can restrict access to certain website pages or community content so that only logged-in or paying users can access it. It’s ideal for membership websites.
Yes. In the block editor, go to Background Styling to apply gradients, custom hex codes, or background images
Can't find the solution to your problem and feeling stuck?
No worries at all! We're here to help you out. You can easily reach us in two ways: either by sending an email to support@venturz.co or by clicking on the live chat 💬 button located in the right bottom corner of your screen. Don't hesitate to get in touch with any questions you might have!
Startup Events
Live Chat