
The Products feature in Venturz helps you create and manage pricing plans for your services, digital tools, SaaS platforms, or any subscription-based offering. Whether you're selling access to an AI tool, course, membership, or app—this feature lets you manage billing, plans, usage limits, and more.
Here’s how to get started:

Before you can create a product, you'll need to verify your Stripe account.
- Go to Settings > Finance and verify your account to connect your Stripe.
- This step is required to enable billing and accept payments from your users.
Once your Stripe account is verified, you’ll be able to create and manage paid plans.
You can check if your country is supported by visiting: https://stripe.com/global
If your country is listed there, you’ll be able to make payments without any issues.
Once you verify your stripe account. From your dashboard, click on Products. This is where you'll create, manage, and customize your product offerings—including pricing, billing options, limits, and more.
Use this if you're offering services like:
- SaaS tools
- Membership platforms
- Digital subscriptions
- Online Services
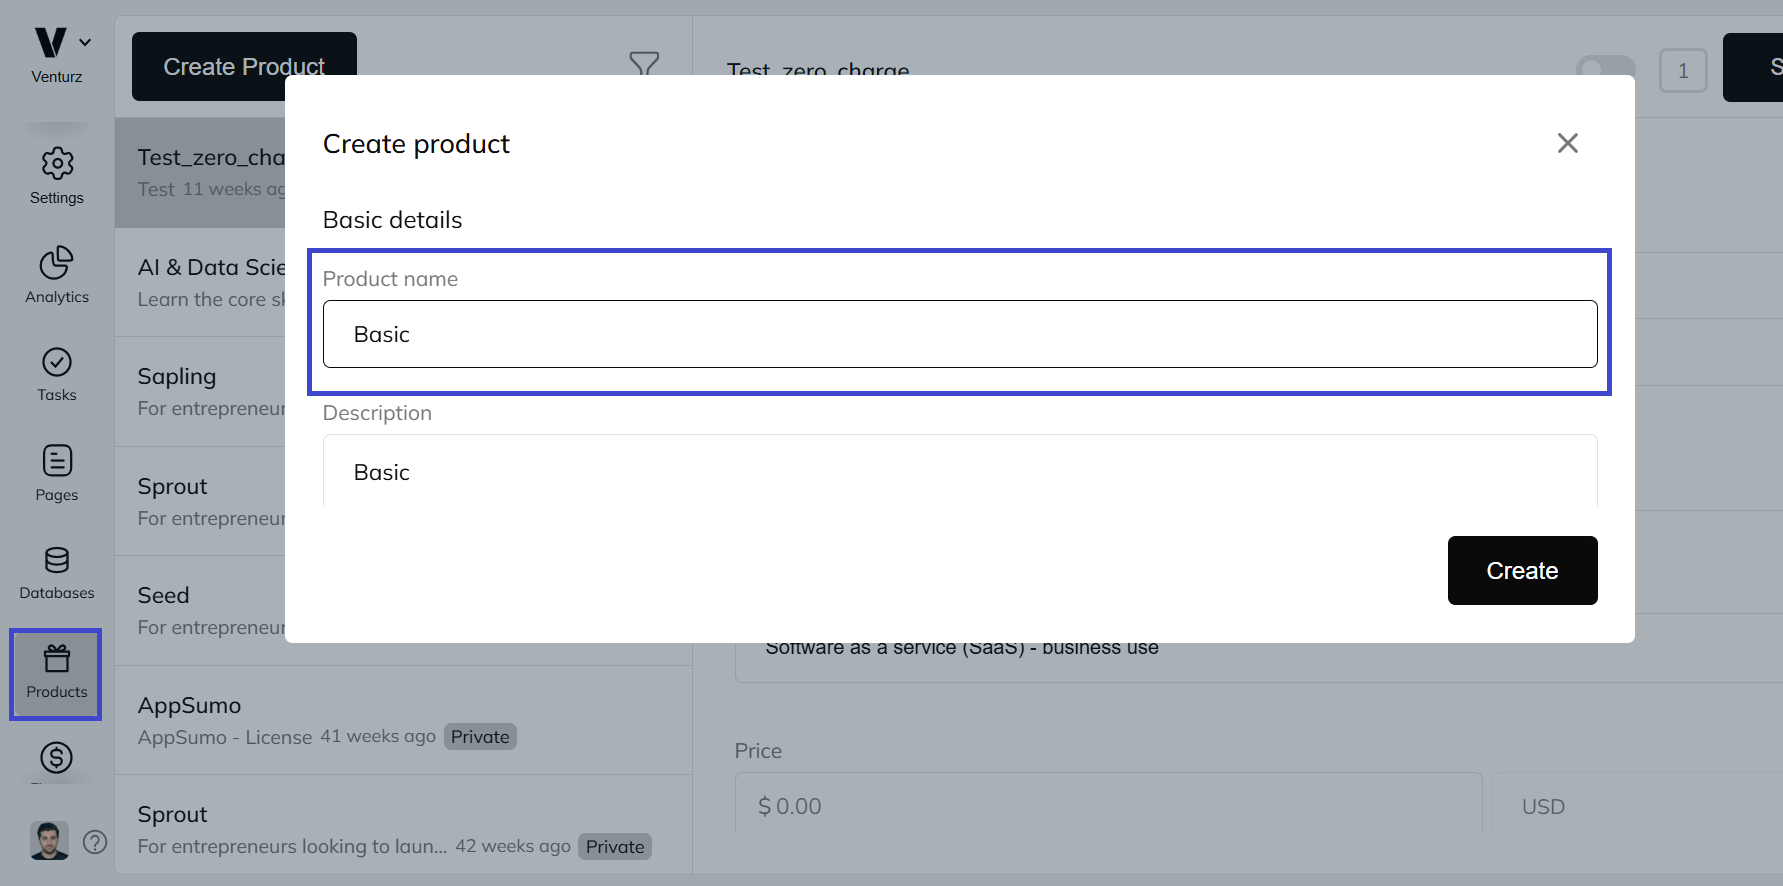
Click Create Product, then enter:
- A clear product name (e.g., “AI Writing Tool” or “Pro Membership”)
- A brief description that explains what the product does and who it's for
Make sure the description communicates the value of your product. This is what users will see when browsing your offerings.

Choose how much your product will cost.
- Enter the price
- Select the currency you want to charge in
You can set different prices for different plans based on the features or limits offered.
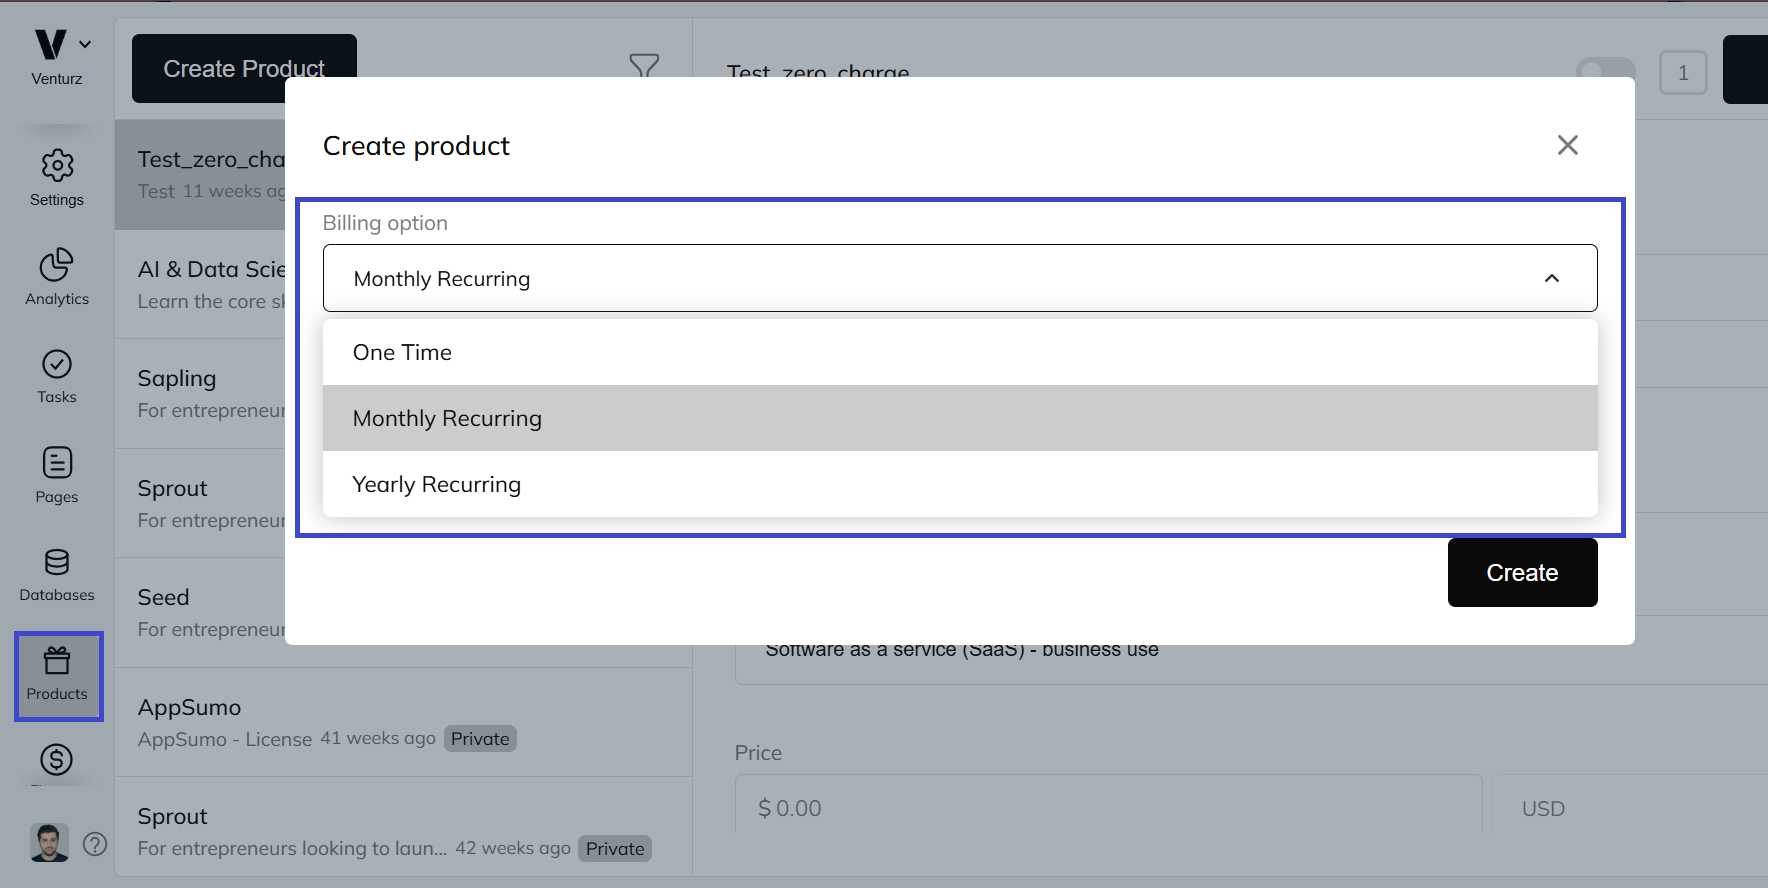
Decide how users will pay:
- One-time payment – great for downloadable products, single-use tools, or lifetime access
- Recurring billing – choose monthly or yearly if you offer ongoing access, like in a SaaS model
This flexibility allows you to cater to different types of customers and revenue models.
Metrics are used to define usage limits for your product—for example, how much a user can access before they need to upgrade.
- Assistant Tokens – Number of AI assistant uses included
- Streaming Time – How many minutes of video streaming are allowed
- Storage (MB) – Total storage provided for the plan
- Messages Sent – Number of messages or emails a user can send
- Contacts Saved – Maximum contacts allowed to be stored in CRM
You set these values while creating your product, and users can view their usage in their Billing dashboard.
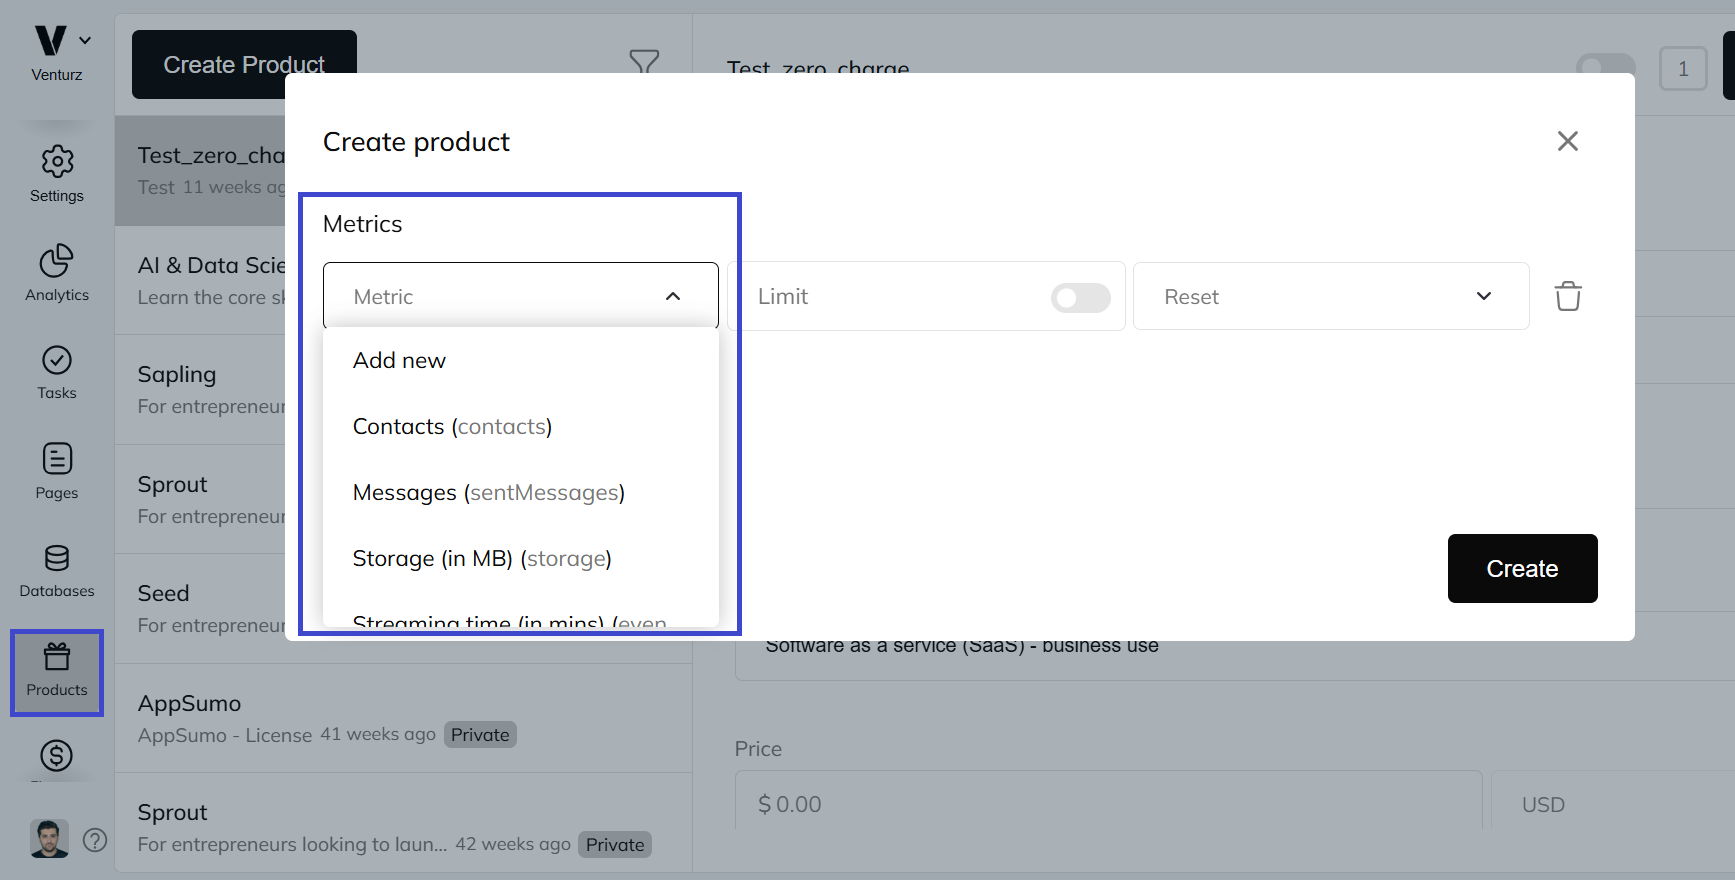
Under the Metrics section, you can set limits for each plan. For example:
- Track usage like “Assistant Tokens,” or “Projects Created”
- Set limits for each pricing tier (e.g., 100 tokens for basic, unlimited for premium)
This is especially helpful for apps or platforms where usage needs to be controlled or scaled with the plan. It also encourages users to upgrade for more features or higher limits.
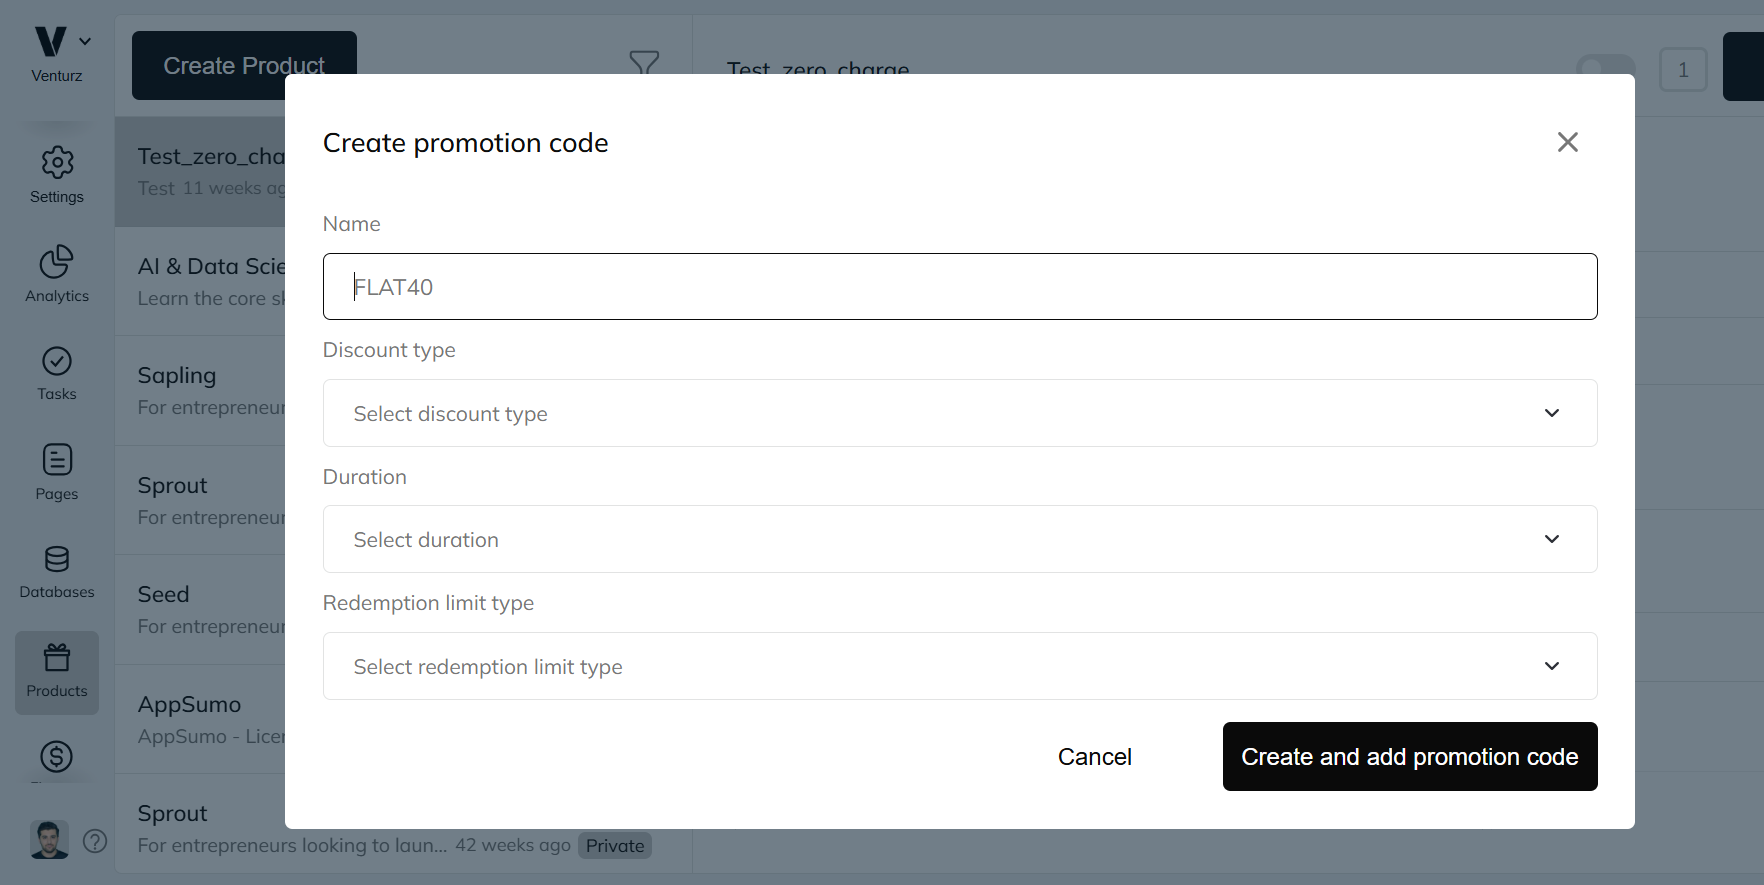
You can allow users to apply discount codes at checkout.
This is a great way to:
- Offer limited-time deals
- Run special promotions
- Reward loyal customers
Adding promo codes is a simple way to boost sign-ups and drive more purchases.
This is the code your users will enter at checkout.
Example: FLAT40, WELCOME10, or SUMMER2025
You’ll be asked to choose how the discount will be applied:
- Amount – A fixed value is deducted (e.g., $10 off).
- Percent – A percentage is deducted (e.g., 40% off).
Choose whichever fits your campaign.
This controls how long the discount will last once it’s used:
- Once – The discount applies only to the first payment.
- Forever – The discount applies every time the user is billed.
- Repeating – The discount applies for a limited number of billing cycles (e.g., first 3 months).
This controls when the promo code should expire:
- Expire after date – You pick a calendar date, and the code becomes inactive after that day.
- Expire after redemptions – You choose how many times the code can be used. After it’s been used that many times, it stops working.
In the Advanced Settings, you can add:
- A Success URL – where users are redirected after completing a purchase
- A Cancel URL – where users are redirected if they cancel checkout
This is useful for tracking conversions and sending users to follow-up pages like thank-you messages, onboarding flows, or support links.


When you're creating a product in Venturz, you’ll see a section called Metadata near the bottom.
Think of metadata like extra labels or tags you attach to a product. These are not visible to users, but they help you or your team organize, filter, or track your products better.
Let’s say you’re creating a paid plan just for your most active users.
- In the first box (called the key), you type: UserGroup
- In the second box (called the value), you type: Power Users
This means:
- "This product is for people in the 'Power Users' group."
- You're telling the system (or your internal tools):
- "This plan belongs to a special user group."
Once added, these metadata fields show up inside each customer’s CRM profile when they purchase that product. This makes it easier to:
- Segment customers based on metadata
- Run targeted campaigns
- Filter your audience by plan, user type, or behavior
It’s a simple way to link products and users behind the scenes—so your marketing and support teams stay aligned.

When you're creating a product in Venturz, you'll see an option at the bottom called Default Product — with a small toggle switch.
This setting controls which product is automatically assigned to new users when they sign up and don’t choose a specific plan.
Let’s say you have a free basic plan and a paid premium plan.
If you set the free plan as the default product, then every new user who signs up (without picking a plan) will automatically get the free version.
This is helpful if:
- You want to offer a free trial or freemium access
- You want users to start using your platform immediately
- You don’t want to force them to choose a plan upfront
- Scroll to the bottom of the product setup page.
- You’ll see the “Default Product” toggle.
- Just turn it on for the plan you want as default.
Design pages using our website builder and showcase them with a checkout CTA. Just go to 'Pages', type '/', scroll down to the product block, and add it.

To keep track of how you're using your available credits and limits, go to Profile → Billing. This section shows a clear breakdown of your current usage, including:
- Contacts Saved
- Messages Sent
- Storage Used (in MB)
- Streaming Time (in Minutes)
- Assistant Tokens Consumed
You’ll also be able to see how much you’ll be charged if you exceed your plan’s limit. Currently, Venturz charges $0.01 per unit for additional usage beyond your included quota.
If you notice your usage is consistently high, you can upgrade your plan anytime to get more resources at a better rate.
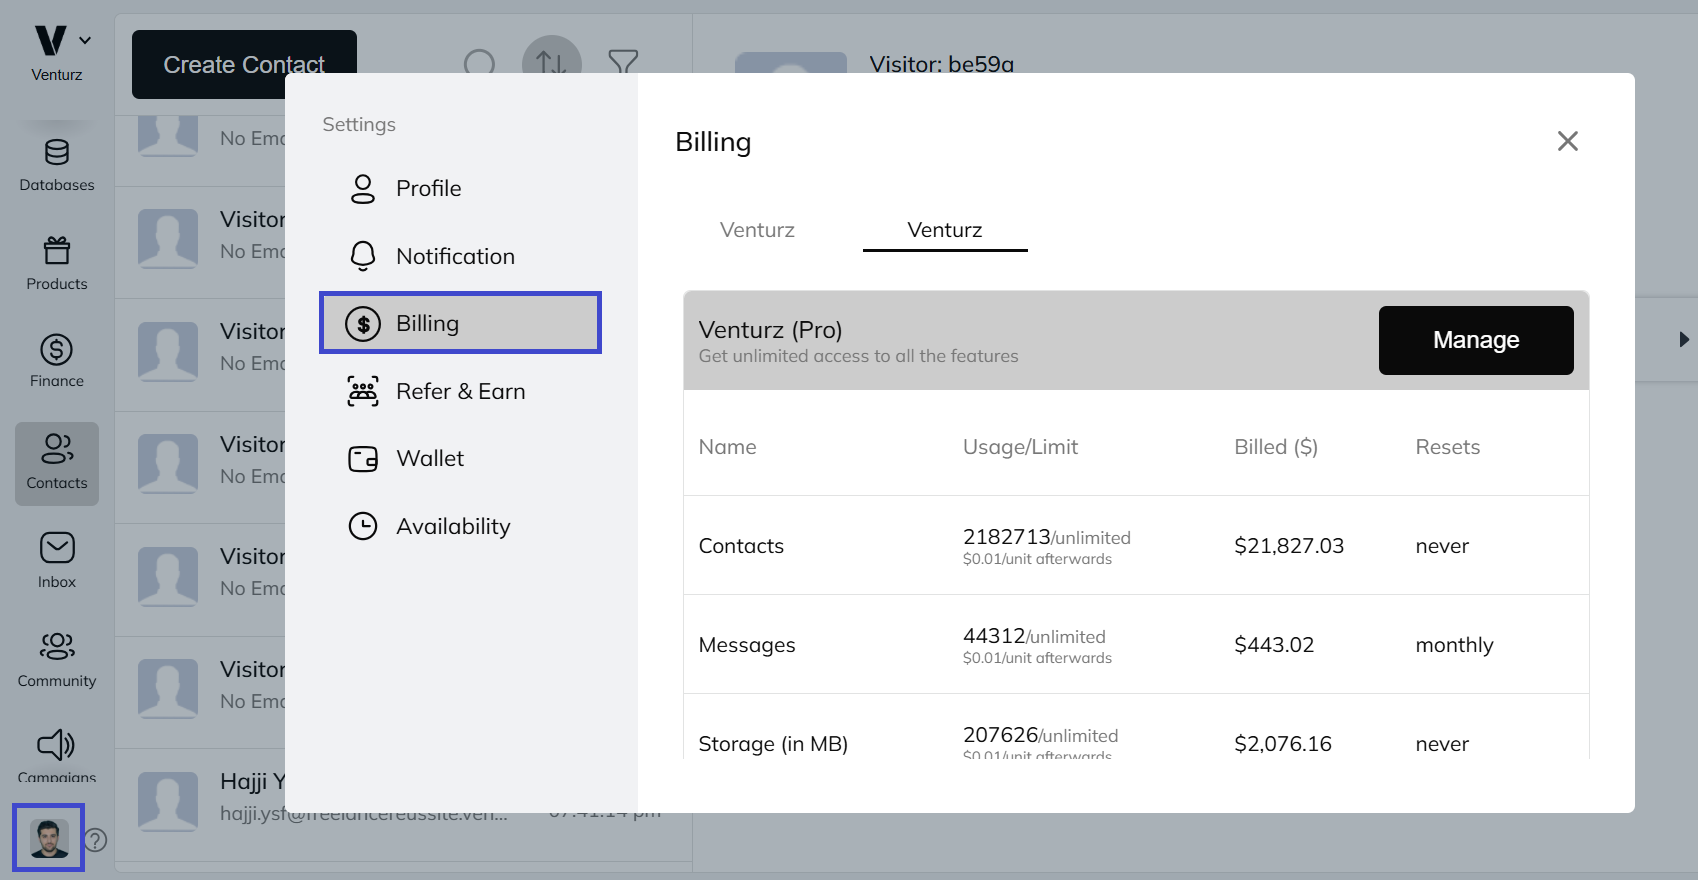
In the Billing tab, under the plan you’ve purchased (like "Venturz Pro"), you’ll see a Manage button. When you click that button, you’ll be redirected to a Stripe-hosted subscription portal.
From there, you can:
- View all your active and past invoices
- Update your payment method
- Cancel or upgrade your subscription
- See your next estimated billing amount
This gives you full control over your subscription without leaving the Venturz dashboard.
As a startup owner, you’ll see two types of products in your Billing section:
- Venturz Platform Plan – This is the subscription you're using for accessing platform-wide features like AI tools, live chat, analytics, etc.
- Your Own Venture Products – If you’ve created and published any paid plans for your customers through the Products feature, you’ll also see those listed here under the corresponding venture.
This makes it easy to track what you're paying for, and what your venture is offering to others—all in one view.

Can't find the solution to your problem and feeling stuck?
No worries at all! We're here to help you out. You can easily reach us in two ways: either by sending an email to support@venturz.co or by clicking on the live chat 💬 button located in the right bottom corner of your screen. Don't hesitate to get in touch with any questions you might have!
Startup Events
Live Chat